Yeah! Long time no writing but still hacking out there. I am really busy this days. Six weeks giving training for a big customer, consuming all the time I have, almost all the time. The time remaining, I need to dedicate to my lovely family. Well,give training is an amazing opportunity to learn, hold what you know in your head and learn more. It is an very good way to keep stuff alive.
The newer interesting subject is Hotspot. This is actually new. Was ratified early 2011 and it still being deployed for large companies. The fact is, hotspot takes wifi to a very interesting level. Its integration with Cellular network makes thing really nice.
I am in range to understand a lot of new concepts and the idea is write it down here for study purpose.
Basically Hotspot adds new functionalities to the traditional wifi technology by adding some activities after wifi pre activities. I mean, in a traditional wifi environment, you see the SSID being spread out there, you try to connect to that SSID using some kind of security or not and end up with a connection.
So far so good, after all, being connected will be always the objective or not ? But, it turns out that the process just described was never practical. You need to make the move. You always need to connect in some SSID.
What about Cellular Network ? Do you need to ask for you cell phone gets connected ? you don´t. Once you are in range with any network, you will be able to connect and use the service seamlessly. How is that possible ? and it is possible to have such set up on the Wifi world ?
The answer for those question will come later in new post.
Cheers! Wireless have been demystified in my head more and more. It is expected that in a few time I ´ll not see too much challenge by deploying wireless network. But, thanks to the market, new stuff are popping up and this keeps me busy.
Wednesday, September 9, 2015
Friday, June 26, 2015
Cisco UCS : The nitty-gritty
Well, as many of you may know, some time ago Cisco decided to build its own server hardware. As I remember, it used to use HP server hardware for quite sometime and I can remember that when it came to the public that Cisco will launch its own hardware, was a big commotion on the market. For some time it was the News on the IT area.
At that time, although I was pretty interested, it was happening thousands Miles away from me. After this rupture, Cisco has launched the UCS line. Still for long time I heard something here and there about UCS but it was still far away. Until last days.
The company I work for, wisely, decided that we should be able to setup our UCS and this should not be a Data Center team activity. Oh!! that´s nice to hear! and here we go! Setup, from scratch, my first UCS in a Data Center.
So far so good. Data Center was not something new for me and devices by devices I have had seen a lot last times. But, it is not that simple.
When it comes to UCS from scratch you have basically two option. First you can setup a DHCP server on his own machine, plug you machine on the UCS Management port , observe which IP address it gets, put that IP in a web browser and you will might see a interface like that:

Cisco Integrated Management Controller is an interface where you can setup IP address and others few parameters for your box.
Therefore, if you have not a DHCP server available, you can reach the same result by pressing F8 during the boot and it will brings you to the same CIMC, but now, with more simple interface.

The picture shows that the CIMC actually gets an IP address, probably from an DHCP server. But what we want to show here is the possibility in press F8 key. It will get you to the following interface:

Once you gets there, just configure all the parameters you consider necessary and press F10 to save. After that, go to the browser and type in the IP address you just choose for your box. This will take you to the same step we were before.

We can see from the picture above a small icon where we can see in front of it "Launch KVM Server". This magic button allows you go a step further on building your environment. After all, you cannot only bring a box up and it is done!
Well, I can´t for sure affirm that in all cases the behavior from here will be the same and this is not my intention, but, in my case when I pressed that button, my browser downloaded a java file on my local drive. If this is your really first UCS setup, this part will economize you some times.

The File shown on the picture "viewer.jnjp..." is the file download when I pressed KVM button. What the hell I do with it ? It is expected that you rename it and strip out everything after viewer.jnlp.
After that, you will get a little shortcut like this one:

Just execute the Java program and you should finished with a KVM interface console. If you cannot , verify your Java setup.
This is for a Portuguese PC but you can find it out in our native language.
After that, you will end up with a KVM window. It is simple and I have not an example right here. You need to find your virtual Media. Reboot the server, change the boot sequence to the virtual Media you just mapped and proceed with the installation. It can be an VMWare ESXi environment, where you can setup any others Virtual machine or it can be an .ISO image for a Operational Systems.
Then we came to an end with this beauty history about setting up a brand new Cisco UCS. Sadly, not everything is flower. I had some interesting problem and I'd like to share in another article.
Cheers.
At that time, although I was pretty interested, it was happening thousands Miles away from me. After this rupture, Cisco has launched the UCS line. Still for long time I heard something here and there about UCS but it was still far away. Until last days.
The company I work for, wisely, decided that we should be able to setup our UCS and this should not be a Data Center team activity. Oh!! that´s nice to hear! and here we go! Setup, from scratch, my first UCS in a Data Center.
So far so good. Data Center was not something new for me and devices by devices I have had seen a lot last times. But, it is not that simple.
When it comes to UCS from scratch you have basically two option. First you can setup a DHCP server on his own machine, plug you machine on the UCS Management port , observe which IP address it gets, put that IP in a web browser and you will might see a interface like that:

Cisco Integrated Management Controller is an interface where you can setup IP address and others few parameters for your box.
Therefore, if you have not a DHCP server available, you can reach the same result by pressing F8 during the boot and it will brings you to the same CIMC, but now, with more simple interface.
The picture shows that the CIMC actually gets an IP address, probably from an DHCP server. But what we want to show here is the possibility in press F8 key. It will get you to the following interface:
Once you gets there, just configure all the parameters you consider necessary and press F10 to save. After that, go to the browser and type in the IP address you just choose for your box. This will take you to the same step we were before.

We can see from the picture above a small icon where we can see in front of it "Launch KVM Server". This magic button allows you go a step further on building your environment. After all, you cannot only bring a box up and it is done!
Well, I can´t for sure affirm that in all cases the behavior from here will be the same and this is not my intention, but, in my case when I pressed that button, my browser downloaded a java file on my local drive. If this is your really first UCS setup, this part will economize you some times.
The File shown on the picture "viewer.jnjp..." is the file download when I pressed KVM button. What the hell I do with it ? It is expected that you rename it and strip out everything after viewer.jnlp.
After that, you will get a little shortcut like this one:
Just execute the Java program and you should finished with a KVM interface console. If you cannot , verify your Java setup.
This is for a Portuguese PC but you can find it out in our native language.
After that, you will end up with a KVM window. It is simple and I have not an example right here. You need to find your virtual Media. Reboot the server, change the boot sequence to the virtual Media you just mapped and proceed with the installation. It can be an VMWare ESXi environment, where you can setup any others Virtual machine or it can be an .ISO image for a Operational Systems.
Then we came to an end with this beauty history about setting up a brand new Cisco UCS. Sadly, not everything is flower. I had some interesting problem and I'd like to share in another article.
Cheers.
Monday, May 18, 2015
Litle Bit of Shell Script - Part 2
I Just made a change in the script. Actually, the script was working just fine but I had only one single problem with it. If I had two file on the directory to be compressed, the script would make only one compressed file. Although this situation might not happen in the environment I'd like to implement this script, I was not comfortable with it. Tried many ways to overcome this problem but, in fact, the original script with only one change was able to give me the result I wanted.
The original script was:
NOW=$(date +"%m-%d-%Y")
FILE="Prime-Backup.$NOW.tar.gz.$$"
tar -zcf $FILE $files
NOW=$(date +"%m-%d-%Y")
tar -cz -f "$file".$NOW.MyFile.tar.gz "$file"
I Keep the variable "NOW" because it is important to define the file's date but I changed the line that was screw up the results. As I was putting the final file in a variable called $FILE, I always had only on file as output. As soon as I specify the $file, the script start to compress by file. To keep things organized, I put the Date command inside the file's name. Now is complete. Everything the script supposed to do, it finally does.
#!/bin/bash
#Create a reference file
touch -d -20days "/tmp/20dayref.$$"
#Go to the directory in which my files resides
cd /home/pendrive
#Looking for file with specific characteristics
find . -type f -name 't*' -print | while read file
#if found, do
do
#If file is newer than the reference file, and if has the specific characteristics
if [[ ("$file" -nt "/tmp/20dayref.$$") && ( "$file" =~ \.txt$) ]]
then
#Compress the file using the current date and some specific information
echo "File": $file " is newer than 20 days"
echo "Compacting...."
NOW=$(date +"%m-%d-%Y")
tar -cz -f "$file".$NOW.MyFile.tar.gz "$file"
#For clean up metter, delete original files
echo "Deleting original backup file...": $file
rm $file
#If file is older than the reference file
elif [[ "$file" -ot "/tmp/20dayref.$$" ]]
then
#Delete it
echo "File": $file "is older than 20 days"
echo $file
echo "Deleted permanently...."
rm $file
else
#If nothing is found to do, just print the success message
echo "Job successfully completed!!!!"
fi
done
Friday, May 15, 2015
Litle Bit of Shell Script
I've written posts about Python and Python is in fact a great programming language. But, recently I needed solve a situation in which Shell Script was more indicated:
Thanks to the excellent forum about Script :
http://www.unix.com/
Instead of write a whole new post, I'm gonna put here the post I put there. The conclusion, let´s say:
"I'm sharing my code here. Sure it is not elegant but it is doing exactly what I need. So, it is useful !
I have a server that makes backup each 7 day in a FTP server. I want to keep only 3 files and compacted.
The first time that this code will be executed, let´s say 7 days from here, it is expected that will have one file on the FTP server. Then, the script will only compact it.
Seven day after and the script will run again. This time, we will have two files : A new backup file from the server and a .gz file created last time.
I want to keep the .gz, since it has not 20 days yet and I want it compacted.
Later on, there will be situations which we will have a new backup that needs to be compacted, .gz files that need to be kept and .gz file older than 20 days that needs to be deleted.
The FTP should be managed like this way:
backup files coming every 7 days.
Only new backup files being compacted
files .gz newer than 20 days keeps untouched
files .gz older than 20 days being deleted
By deleting file older than 20 days, allows to me at least 3 backup files on the FTP server. This is more than necessary for my needs.Another point is that this FTP server receives files from other servers as well. Then it is necessary to verify which file I need to handle exactly"
First, I coming to the forum asking for help. I was trying to accomplish the same task but I was using a different approach and an inadequate one.
I was using "for" and I was trying to get the variable generated from:
files=($(find . -type f -name 't*' -mtime +"$days"))
if [ $? = "0"]
As explained by someone on the forum:
"The $? will change after every command, so within the loop you can't depend on it. On top, the second if [[ $? ... ]] 's result is unpredictable at all. To do several tests on the result of a single command, assign its $? to a variable and test against this."
This is true and I got stuck trying to solve it.
Then, someone else proposed to create a temporary with the age of 20 days and use it as comparison. It works very well. Maybe I will never get to that by myself.
It was very interesting Challenge!!!
#!/bin/bash

# Create a temp reference file:

touch -d -20days "/tmp/20dayref.$$"


cd /srv/ftp

find . -type f  -name 't*' -print | while read file

//backup file starts with 't'

do

    if [[ ("$file" -nt "/tmp/20dayref.$$") && ( "$file" =~ \.txt$) ]]

//I am using .txt as example. It must reflect your backup extension.

    then

 #file is younger --append to archive


    echo "File": $file " is newer  than 20 days"
    echo "Compacting...."
    NOW=$(date +"%m-%d-%Y")
    FILE="test-Backup.$NOW.tar.gz.$$"
    tar -cz -f "$FILE" "$file"
    echo "Deleting ...": $file
    rm $file


elif [[ "$file" -ot "/tmp/20dayref.$$" ]]

then


 #file is old delete it

    echo "File": $file "is older than 20 days"
    echo $file
    echo "Deleted  permanently...."
    rm $file

else

echo "Job successfully completed!!!!"

    fi

done
Wednesday, May 6, 2015
Really getting stated with Python

Well, looks like my decision in starting again AND with Python was the right one. I am loving it.
As my first post with 'hands on' will be a very simple code taken from an excellent material I found on the Internet: "Hacking Secret Ciphers with Python with"
Despite the pretentious title, the material if extremely newbie and very well written. I am expecting to learn a lot about coding and security.
After explain many concepts about Python, the author presents a very simple code:
#Getting starting with Hacking ciphers
message = 'This message intend to be inverted'
inverted = ''
i = len(message) -1
while i>=0:
inverted = inverted + message[i]
i = i -1
print(inverted)
As the book talks about cryptography and Cipher, this little program aims to perform a very simple way to add a very little security layer at the information. We are just inverting letters inside the message. For sure this is not considered to be a form of security. But, the idea here is start handling code in order to understand its utility in getting security information through the network.
Python 3.4.3 (v3.4.3:9b73f1c3e601, Feb 24 2015, 22:43:06) [MSC v.1600 32 bit (Intel)] on win32
Type "copyright", "credits" or "license()" for more information.
>>> ================================ RESTART ================================
>>>
detrevni eb ot dnetni egassem sihT
>>>
I'll try to explain this simple code. Actually to me even this code is not that simple. In short, what it does is at first the variable named message receive the value 'This message intend to be inverted'.
Every time you create a variable, you are actually reserving a memory space and putting there a value. In this case, the value is a "String". In Python, string can be written inside simple quote or double quote.
If I put something like print(message) I'll retrieve the value in the memory and print will show the phrase.
Moving down to the code, we have another variable named inverted. This variable has no value. We have just allocated a space in the memory and let it empty.The idea is use this empty slot in conjunction with the variable message in order for invert the phrase.
Moving down, we can see a new variable name "i". The i's value will be a Python's function named len(). This function has the ability to return an integer representing how many characters there are in the string.
To prove it, we can change our code:
#Getting starting with Hacking ciphers
message = 'This message intend to be inverted'
inverted = ' '
i = len(message) -1
print(i)
while i>=0:
inverted = inverted + message[i]
i = i -1
print(inverted)
We just inserted a print(i) after i = len(message) -1
The output can be seen bellow:
Python 3.4.3 (v3.4.3:9b73f1c3e601, Feb 24 2015, 22:43:06) [MSC v.1600 32 bit (Intel)] on win32
Type "copyright", "credits" or "license()" for more information.
>>> ================================ RESTART ================================
>>>
33
detrevni eb ot dnetni egassem sihT
>>>
First, it shows how many characters has the string. Then, it shows the string inverted.
We can do one more thing:
#Getting starting with Hacking ciphers
message = 'This message intend to be inverted'
inverted = ' '
i = len(message) -1
print(i)
while i>=0:
inverted = inverted + message[i]
i = i -1
print(message)
print(inverted)
>>> ================================ RESTART ================================
>>>
33
This message intend to be inverted
This message intend to be inverted
This message intend to be inverted
This message intend to be inverted
This message intend to be inverted
This message intend to be inverted
This message intend to be inverted
This message intend to be inverted
This message intend to be inverted
This message intend to be inverted
This message intend to be inverted
This message intend to be inverted
This message intend to be inverted
This message intend to be inverted
This message intend to be inverted
This message intend to be inverted
This message intend to be inverted
This message intend to be inverted
This message intend to be inverted
This message intend to be inverted
This message intend to be inverted
This message intend to be inverted
This message intend to be inverted
This message intend to be inverted
This message intend to be inverted
This message intend to be inverted
This message intend to be inverted
This message intend to be inverted
This message intend to be inverted
This message intend to be inverted
This message intend to be inverted
This message intend to be inverted
This message intend to be inverted
This message intend to be inverted
detrevni eb ot dnetni egassem sihT
>>>
I just add a print after i = i -1 and we can see the code inserting the phrase in the memory as much times as the amount of character in the string.
We can also discriminate which character is in a specific position:
#Getting starting with Hacking ciphers
message = 'This message intend to be inverted'
inverted = ' '
i = len(message) -1
print(i)
print(message[11])
while i>=0:
inverted = inverted + message[i]
i = i -1
print(inverted)
>>> ================================ RESTART ================================
>>>
33
e
detrevni eb ot dnetni egassem sihT
>>>
We are showing how many characters there are in the whole string and which character is in the position 11 of the memory. In this case the character "e".
The last one is far more interesting:
#Getting starting with Hacking ciphers
message = 'This message intend to be inverted'
inverted = ''
i = len(message) -1
print(i)
print(message[11])
while i>=0:
inverted = inverted + message[i]
print(i, message[i], inverted)
i = i -1
print(inverted)
This produce the following output:
Python 3.4.3 (v3.4.3:9b73f1c3e601, Feb 24 2015, 22:43:06) [MSC v.1600 32 bit (Intel)] on win32
Type "copyright", "credits" or "license()" for more information.
>>> ================================ RESTART ================================
>>>
33
e
33 d d
32 e de
31 t det
30 r detr
29 e detre
28 v detrev
27 n detrevn
26 i detrevni
25 detrevni
24 e detrevni e
23 b detrevni eb
22 detrevni eb
21 o detrevni eb o
20 t detrevni eb ot
19 detrevni eb ot
18 d detrevni eb ot d
17 n detrevni eb ot dn
16 e detrevni eb ot dne
15 t detrevni eb ot dnet
14 n detrevni eb ot dnetn
13 i detrevni eb ot dnetni
12 detrevni eb ot dnetni
11 e detrevni eb ot dnetni e
10 g detrevni eb ot dnetni eg
9 a detrevni eb ot dnetni ega
8 s detrevni eb ot dnetni egas
7 s detrevni eb ot dnetni egass
6 e detrevni eb ot dnetni egasse
5 m detrevni eb ot dnetni egassem
4 detrevni eb ot dnetni egassem
3 s detrevni eb ot dnetni egassem s
2 i detrevni eb ot dnetni egassem si
1 h detrevni eb ot dnetni egassem sih
0 T detrevni eb ot dnetni egassem sihT
detrevni eb ot dnetni egassem sihT
>>>
It prints the total number of character, the eleven character and each memory position with its respective value.
And this is it. This simple code is able to read the string, count how many characters it has, decrease it one by one and put each value in the memory and show it inverted.
According to "while", "i" must be greater than or equal to zero. This is the trigger to the code stop the process and show the message.
The result is quite simplistic but the idea is great. In a so simple code we can see lots of concepts surrounding this amazing programming language.
Monday, May 4, 2015
Getting started with Coding
This is not the first time I decide to start with Coding. Since the university where I was presented to Java, I have made some approaches with Shell and C. I have gave up from both.
The fact is, for some reason I don't know, I have some difficult to dedicate all my attention in learning coding. I feel like when I was in the middle school learning math. I was not that bad, actually I was good,but, I have had to spend a lot of energy to stay focus. If I was able to stay focus since the beginning of a new subject in math, I was able to compete with those who had much more talent than me. Different from any other subject with a few amount of time and energy I was able to go for it and have a nice score.
I feel the same when it comes to coding. I had not a good experience with Java in the university and I hated to have Java in a Computer administration course.
The reason why I decided to try again is because there is always a voice inside me saying to learn it. Actually, I can do my job very well without knowing any programming language, I did it so far, but, I realize that to go farther and really make the difference, I need to know at least one scripting programming language.
With that in mind, I decide to try again and this time I choose Python. Python looks a lovely Programming language. It can be defined as a scripting language and looks far more easier than Java or C. I know that if a programmer read this post he would say something like "you need to learn the logic", programming language is just a tool to use the logic. Ok, I agree, but, I don't see any problem in get more comfortable with one tool than other. As I see so far, Python looks really great.
I am really excited about it. I feel like I finally found something to start. As long as I can keep focus, I believe I can learn it and have success using it during my jobs. I have seen Python inside boxes I have access to. Cisco boxes are full of Python scripts. I know I can not change it but I can understande it and maybe getting more comfortable and easy my pain in some situation.
I've read about nice things related with Data centers automation and it is all about scripting. Water it down can be the next step I need to become more and more successful in my profession. That's I am always looking for.
Sunday, April 26, 2015
Blog Title change.
Well, this my self study blog. I dont need actually justify any change. I feel free to add/delete and change anything at any time I want. I think routingtelecom is too big. And it cames from a time when I was intending to start a company as Asterisk consultant. Then Telecom has something professional. As this idea pass away and it turned into a self study blog only, I think RoutiOS may be better. I love route as it is the truly and real process that allows any kkind of communication. And iOS is the most common and used term in this days. Cisco and Apple the sexiest world companies uses those three letters to designate the operating systems.
This is smaller and even more representativa but at the end is just a title. What I realy want is share more and more interesting stuff on it.
Thats the reason, thats my goal.
This is smaller and even more representativa but at the end is just a title. What I realy want is share more and more interesting stuff on it.
Thats the reason, thats my goal.
Saturday, April 25, 2015
QUIC Protocol - The protocol Quick
The Internet traffic has grown tremendously in last years. The demand for faster Internet keeps growing and surprisingly we are working with protocols developed 40 years ago. Even http version largely used today (http 1.1) was developed around 90's.
It is not difficult to realize that we need to build faster protocols. Protocols able to handle the today's Internet.
TCP has made remarkable work until now and will do for many years ahead but TCP was developed in a totaly different scenario.
Companies has made huge effort trying to make things better. To delivery much better experience for users. And in this scenario, Google came with a brend new protocol called QUIC (Quick UDP Internet Connection).
Before deep dive in QUIC, it is important discus about another protocol also developed by Google, this one called SPDY. As mentioned before, http 1.1 is no longer indicated for today's Internet. It was developed in a time where web pages were static, load from one only source and one domain. Today´s web page are load from about 80 differents sources and about 30 domain. The web page is a big mosaic and each piece coming from one point of the world. Sure enough, to handle all of it is necessary a very smart and high performance protocol.
In this scenario Google has developed SPDY. The main goal of SPDY and QUIC is reduce Latency. It is all about latency. SPDY is a application protocol that works compressing,multiplexing and prioritizing data.
According to Google's SPDY definition, "SPDY is a multiplexed stream protocol currently implemented over TCP. Among other things, it can reduce latency by sending all requests as soon as possible (not waiting for previous GETs to complete)"
But, there's a problem here. As mentioned SPDY run over TCP and TCP has some characteristic that is not in accordance with the goal of SPDY low latency.
TCP has a known behavior called Head-of-Line Blocking. Since TCP only provides only a single serialized stream interface, if one packet is lost it will interfere in the entire SPDY communication. SPDY multiplex many stream over TCP connection but Head-of-Line Blocking cancels it.
A good example of this scenario can be seeing bellow:

If the red packet is lost, all other flows must wait.
To overcome this and others issues, QUIC comes to the scene. With QUIC, the above scenario has changed completely:

From now one, the improvement allowed by SPDY shows up. If the red packet is lost, the whole flow does not suffer anymore.
QUIC run over UDP for good reason. UDP does not perform three way hand shake as TCP. Its nature makes it fast. As QUIC aims to zero RTT it is impossible to run over TCP.
The following figure shows that concept:

With QUIC, Google aims the following goals. Those goals were taken from "QUIC: Design Document and Specification Rationale".
1-Widespread deployability in today’s Internet.
This is not easy to achieve. As we may know, Google can't perform any change in the Internet structure. SPDY and QUIC must be transparent on the Internet. Otherwise it will be blocked along the firewalls and router out there.
Perform change in TCP/UDP/IP headers only can be made by regulatory entities and it takes lots of years. Furthermore, the adoption of this changes can take even more time. Those protocol lives inside all kernel around the world and it is really complicate to get all those kernel upgraded.
2. Reduced head-of-line blocking due to packet loss
As we saw above, this is possible with QUIC.
3. Low latency (minimal round-trip costs, both during setup/resumption, and in
response to packet loss)
This is the main objective of the protocol
4. Improved support for mobile, in terms of latency and efficiency
5. Congestion avoidance support comparable to, and friendly to, TCP
6. Privacy assurances comparable to TLS
7. Reliable and safe resource requirements scaling
8. Reduced bandwidth consumption and increased channel status responsiveness
9. Reduced packet-count
10. Support reliable transport for multiplexed streams
11. Efficient demux-mux properties for proxies
12. Reuse, or evolve, existing protocols at any point where it is plausible to do so,
without sacrificing our stated goals
By achieving those goals, Google will have built a much more fast Internet. I doubt anyone has courage to say Google will fail in building such huge accomplishment. Considering the past and present of this remarkable company, we must wait nothing but the whole Internet structure transformed forever. As network engineer, we need to understand those protocols and any other to come to stay ahead of our time. Google has already proved its capacity in transform the way we live.
This is a "Quick" overview about this very interesting protocol. I'd like to go deeper and maybe perform some practical demonstration. But we can continue in another article.
What do you think about it ? Will Google really going to change the whole Internet by developing protocols like QUIC and SPDY ?
Is it possible a future where we will have Google Apps, Google operational System, Google Internet protocol and Google world wide network ?
It is really scary , isn't it ?
It is not difficult to realize that we need to build faster protocols. Protocols able to handle the today's Internet.
TCP has made remarkable work until now and will do for many years ahead but TCP was developed in a totaly different scenario.
Companies has made huge effort trying to make things better. To delivery much better experience for users. And in this scenario, Google came with a brend new protocol called QUIC (Quick UDP Internet Connection).
Before deep dive in QUIC, it is important discus about another protocol also developed by Google, this one called SPDY. As mentioned before, http 1.1 is no longer indicated for today's Internet. It was developed in a time where web pages were static, load from one only source and one domain. Today´s web page are load from about 80 differents sources and about 30 domain. The web page is a big mosaic and each piece coming from one point of the world. Sure enough, to handle all of it is necessary a very smart and high performance protocol.
In this scenario Google has developed SPDY. The main goal of SPDY and QUIC is reduce Latency. It is all about latency. SPDY is a application protocol that works compressing,multiplexing and prioritizing data.
According to Google's SPDY definition, "SPDY is a multiplexed stream protocol currently implemented over TCP. Among other things, it can reduce latency by sending all requests as soon as possible (not waiting for previous GETs to complete)"
But, there's a problem here. As mentioned SPDY run over TCP and TCP has some characteristic that is not in accordance with the goal of SPDY low latency.
TCP has a known behavior called Head-of-Line Blocking. Since TCP only provides only a single serialized stream interface, if one packet is lost it will interfere in the entire SPDY communication. SPDY multiplex many stream over TCP connection but Head-of-Line Blocking cancels it.
A good example of this scenario can be seeing bellow:
If the red packet is lost, all other flows must wait.
To overcome this and others issues, QUIC comes to the scene. With QUIC, the above scenario has changed completely:
From now one, the improvement allowed by SPDY shows up. If the red packet is lost, the whole flow does not suffer anymore.
QUIC run over UDP for good reason. UDP does not perform three way hand shake as TCP. Its nature makes it fast. As QUIC aims to zero RTT it is impossible to run over TCP.
The following figure shows that concept:
With QUIC, Google aims the following goals. Those goals were taken from "QUIC: Design Document and Specification Rationale".
1-Widespread deployability in today’s Internet.
This is not easy to achieve. As we may know, Google can't perform any change in the Internet structure. SPDY and QUIC must be transparent on the Internet. Otherwise it will be blocked along the firewalls and router out there.
Perform change in TCP/UDP/IP headers only can be made by regulatory entities and it takes lots of years. Furthermore, the adoption of this changes can take even more time. Those protocol lives inside all kernel around the world and it is really complicate to get all those kernel upgraded.
2. Reduced head-of-line blocking due to packet loss
As we saw above, this is possible with QUIC.
3. Low latency (minimal round-trip costs, both during setup/resumption, and in
response to packet loss)
This is the main objective of the protocol
4. Improved support for mobile, in terms of latency and efficiency
5. Congestion avoidance support comparable to, and friendly to, TCP
6. Privacy assurances comparable to TLS
7. Reliable and safe resource requirements scaling
8. Reduced bandwidth consumption and increased channel status responsiveness
9. Reduced packet-count
10. Support reliable transport for multiplexed streams
11. Efficient demux-mux properties for proxies
12. Reuse, or evolve, existing protocols at any point where it is plausible to do so,
without sacrificing our stated goals
By achieving those goals, Google will have built a much more fast Internet. I doubt anyone has courage to say Google will fail in building such huge accomplishment. Considering the past and present of this remarkable company, we must wait nothing but the whole Internet structure transformed forever. As network engineer, we need to understand those protocols and any other to come to stay ahead of our time. Google has already proved its capacity in transform the way we live.
This is a "Quick" overview about this very interesting protocol. I'd like to go deeper and maybe perform some practical demonstration. But we can continue in another article.
What do you think about it ? Will Google really going to change the whole Internet by developing protocols like QUIC and SPDY ?
Is it possible a future where we will have Google Apps, Google operational System, Google Internet protocol and Google world wide network ?
It is really scary , isn't it ?
Thursday, April 23, 2015
TACACS on Cisco Prime
This not intend to be an article like many others written in this blog. This aim to be a Tek-Tip more than a article, but, this is the kind of information I consider to be pretty valuable.
I like to write article to teach others the whole concept or even a How-To for some specific tool. But, I really like to share information I couldn't find on the Internet.
I was deploying a Cisco Prime migration from 1.3 to 2.2, maybe many of you don't know but it is not possible to perform that migration directly. It is necessary to migrate to a intermediate version first. Actually, Cisco PI 2.2 will be always a fresh start. What you can do for maintain you old environment is backup/restore your old database. The versions Cisco allows you perform backup to be later restore on Cisco PI 2.2 is:
Cisco Prime Infrastructure 2.1.2 (with the UBF patch)
Cisco Prime Infrastructure 2.1.1 (with the UBF patch)
Cisco Prime Infrastructure 2.1.0.0.87
Cisco Prime Infrastructure 1.4.2
Cisco Prime Infrastructure 1.4.1
Cisco Prime Infrastructure 1.4.0.4
In my case, I was in 1.3 version. Then I decide backup the database and restore in a 1.4.0.4 first. The first problem found here was about platform mismatch. I was not completely aware about the old server and choose a PI 1.4 considering the size of the network. Then I choose a small one. Therefore, as the old server was deployed as a Standard version, I should deploy a Large one. The first situation I faced was about partition sizing. This take me to write a article showing how can we change partition size on Cisco Prime and worked as expected. You can see it here Cisco Prime Partition Resizing
Well, still not aware of this platform details, I did partition resizing and move to the next step: Perform database restore into PI 1.4.
At this time I figured out a mistake. Among 9 steps required for a complete restore, at step 3 I received the errors message: CPU count mismatch.
Then I figured out that I was working with different platforms. Only after redeploy the PI 1.4 as Large, I could finish the restore.
Here you can find a reference:

One last problem was about to be discovered. After I restored the database I lost access to the Web Cisco´s Prime Web Interface.
I had full access through command line but I couldn't via web. To try mitigate this issue, I performed a TCPDUMP at linux level and tried to access the Web interface. I see the server trying to sending authentication request to a TACACS server.
This make sense, after all I restored a database from a server that was using TACACS. And this was an evidence that things were doing well. But, how could I overcome that issue ? It is not possible at that level, allows the server to communication with TACACS. furthermore, that server 1.4 was not supposed to exist on the network for long time.
As I had access through CLI, I performed a database backup to a FTP server and restored into PI 2.2. The result was the same. CLI access but no Web interface access.
Then I start to look for how can I solve that problem. How could I disable TACACS via CLI.I performed many searches on Google and Cisco docs but by no means I could find a clue. No answer.
Only after open a Cisco TAC I could get the answer. This is quite simple but I couldn't find that written in any doc out there.
The solution is change the root password. That's right.
# ncs
password root password <new-password>
Cisco Prime try to reach TACACS server first and than the local authentication. As we can see below:

As we can see, once checked TACACS+, the option "Enable fallback to Local" is checked as well and you can determine between two option. The default is "ONLY on no server response" or you can choose "no authentication failure or no server response".
Back to my scenario, as TACACS server doesn't respond, it was trying local authentication. But, it was a restored database then it is necessary reset root password. It worked for me in 1.4 and 2.2.
Just to complete the Tek-Tip, the backup/restore was a success. All the information was restored and I have a brand new environment with all the old information.Back to my scenario, as TACACS server doesn't respond, it was trying local authentication. But, it was a restored database then it is necessary reset root password. It worked for me in 1.4 and 2.2.
I hope this can help someone else because this is a quite common scenario.
Monday, April 13, 2015
QoS deployment Challenge
QoS, as any other kind of dimensioning, is really challenge. A perfect QoS deployment depends on a really good understanding of the traffic flow and this is something really hard to achieve. Most, if not, all companies out there, have no idea of what is going on through your cables and fibers or wireless.
But, considering that a company out there wants to apply QoS within your network, it is necessary perform some maths and try to get reasonable values based on the traffic and application in use.
Theoretically, traffic is divided in four categories:
-Internetworking Traffic - Basically routing protocols and others protocols used to run the network
-Critical Traffic - Voice,Video,etc
-Standard Data Traffic - Data Traffic like HTTP
-Scavenger Traffic - Traffic not important and sometimes not desirable.
Technically, things happen very deeply in the packets and frames. Understanding QoS involves a deep understanding of bits functioning on a packet. Therefore, so important as know the function is handle it. Is to be able to change those bits according to Customer requirements in order to shape the traffic.
The traffic needs to be Classified first and classify means mark packets first, make them different from each other, put color on it. The way to do that is changing specific bits within a packet or using Access-List and differentiate the hole packet within a packet flow.
To start a fresh QoS deployment is considered to be a good practice deploy some device on the network able to identify all kind of traffic and generate reports based on traffic types and percentage. At this point, you need not perform any kind traffic control, only identify which kind of traffic goes back and forth on the network and which percentage they occupy in the whole traffic.
I've never performed a QoS project so far, but, just like site survey, the proceed above described is not common as it should.
Anyway, from now on we are going to focus on QoS theory. As said above, traffic needs to be classified in any point of the network. The marking can be done at layer 2 or layer 3 of OSI model. Layer 2 frames has a field called CoS (Class of Service) available in the 802.1p

802.1p is part of 802.1Q. It is expected to be seeing only in trunks links. Access Ports has no way to perform this kind of Marking.
Packets can be marked at Layer 3 OSI model using the ToS field.

As we can see from the figure, ToS field is within the IP Packet and is divided in 8 sub field. The function and interpretation of this sub field will be discussed in detail on the next section.
CoS field has 3 bits and 8 possible values whilst ToS has 8 bits and 64 possible values.
The interpretation of the bits has two definition: IP precedence and DSCP (Differentiate Service Code Point). Well, we are going too deep here.
The fact is,this is all about interpretation. IP Precedence uses only the first three bits whilst DSCP use 6 bits. Two bits are used for congestion.
All this is pretty evident when you look at the table bellow:
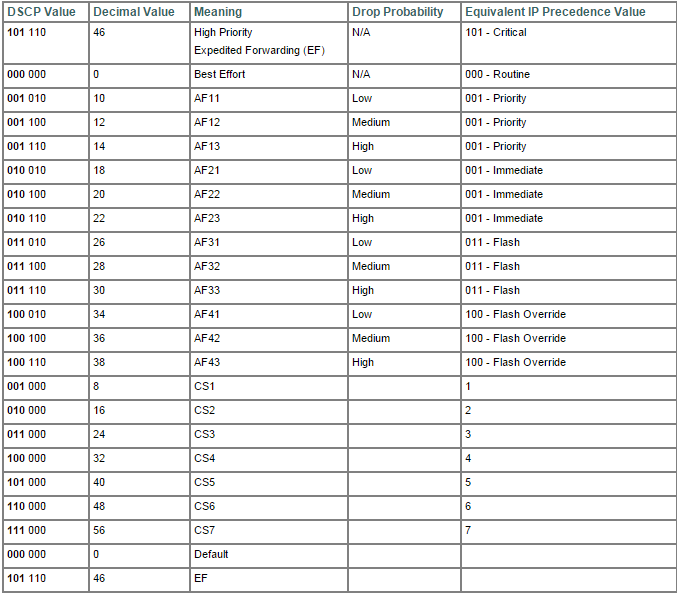
Basically, this tables summarizes all we need to know about QoS in terms of bits.
We can see on the right that IP Precedence has less classes in which we can mold our traffic. In the other hand, on the left we can see that DSCP is plenty of possibilities. We can spread the traffic out to all this classes.
Despite all this value, DSCP can be divided in basically four classes: Best Effort,Assured Forwarding,Expedited Forwarding and Class Selector. Best Effort means no QoS, Expedited Forwarding means the higher priority a packet can have, Assured Forwarding offers many possibility and Class Selector has a spacial meaning.
In terms of bits Best Effort is represented by 000, Assurance Forwarding is represented by 001 to 100 and Expedited Forwarding is represented by 101. Class Selector represent the situation in which last bits is set to zero thus mapping IP precedence and CoS perfectly. For example, the sequence 011000 could be written as AF 30 or CS3. We can see on the table from the CS1 to CS7. In all this case there were a perfect match between CoS and IP Precedence.
We can see in the table above,on the second column, called Decimal Value. DSCP is actually by a decimal value, this make things easier to white and read.
For a Wireless Engineer, it is not expected to know all this bit's functions. But, I personally don't like to narrow down my knowledge. Then, I want to know everything!
Considering that now you know all the bit's functions, it is time to organize all the information and get familiar with Queues and device configuration.
There are basically three kind of Queues:
-Priority Queue (PQ)
-Custom Queue (CQ)
-Weighted Fair Queue (WFQ)
PQ- One Queue being prioritized among all others Queues. Don't matter what.
CQ - Load balance the traffic among many Queues
WFQ- In its basic form, it allows for prioritization of smaller packets and packets which the ToS field is higher.
R1(config)# policy-map MyPolicy
R1(config-pmap)# class MyClass1
R1(config-pmap-c)# bandwidth percent 20
R1(config-pmap)# class MyClass2
R1(config-pmap-c)# bandwidth percent 30
R1(config-pmap)# class class-default
R1(config-pmap-c)# bandwidth percent 35
R1(config-pmap)# end
First of all, we define a policy-map. After all, it is not enough only create Queue. It is necessary apply those Queues somewhere and the way we do that is through Policy.
Inside the Policy Map we create Classes. Here we named it MyClass1,2,etc. At the end we have a default class. It is somewhat like firewall rules. If something does not fit in any condition then it will fall in default class.
There are yet some variances of those Queues:
-CBWFQ(Class-Based Weighted Fair Queue). It allows you to distribute traffic inside classes.
-LLQ (Low Latency Queue) This a variance of the Queue explained earlier. In this scenario, one Queue works like a Priority Queue,therefore, the amount of traffic allowed is limited. The other Queue is served just like normal CBWFQ.
Lets see, in terms of commands, how things goes:
R1(config)# policy-map MyPolicy
R1(config-pmap)# class MyVoiceClass
R1(config-pmap-c)# priority percent 20
R1(config-pmap)# class MyClass2
R1(config-pmap-c)# bandwidth percent 30
R1(config-pmap)# class class-default
R1(config-pmap-c)# bandwidth percent 35
R1(config-pmap)# end
R1#
When it comes to LLQ, we can see a new command: priority and then the percentage. In this case, it was defined 20 %. It means, this Queue, generally used for Voice, can use up to 20% of the whole bandwidth, but, not more then that. If the traffic arrives to 20%, packets starts to be dropped.
Besides this Queues, we can find Congestion mechanisms. WRED (Weighted Random Early Detection). It is very interesting because it uses a natural mechanism of TCP to control traffic congestion. By dropping some packets and forcing retransmission, TCP handshake reduce the Window ,the amount of traffic is consequently reduced.
To enable this future, just type random-detect at interface configuration level.
Well, it works like a charm for TCP but what about UDP ?. UDP does not use Window. Well, I intend to wright down another article about QoS on Wireless network, just like I did with Multicast. That, we will see about CAC and the mystery of UDP congestion control will be solved or handled at least.
We also have one more type of congestion control called LFI (Link fragmentation and Interleaving) Basically it breaks bigger packets in smaller ones avoiding delay with large packets.
That´s all for now. It is important to say that QoS is an end-to-end deployment. It is an waste of time if you deploy QoS considering all the requirements but in one point,only one single point you do not. Everything you done has gone.
I hope you guys enjoy the article. I am working in Wireless QoS article, after all, this supposed to be a Wireless career path. This supposed to be a self study blog and current I am trying to get my CCNP Wireless.
Flavio Miranda.
Wednesday, April 8, 2015
Cisco Prime Partition Resizing
It is expected that when you run an image .iso or .ova, whatever, everything is gonna be all right at the end of the process. After all, we are handling a blackbox created by someone really specialized. But, you may find some surprise out there.
I was happily performing a restore from Prime version 1.3 to a 1.4. Nothing could be wrong on that, I thought! But not!
When I was running the restore command, I got the following errors:
Stage 1 of 9: Transferring backup file ...
-- complete.
Stage 2 of 9: Decrypting backup file ...
-- complete.
Stage 3 of 9: Unpacking backup file ...
--complete.
ERROR: Not enough space to continue restore
What ? How is that possible? My Virtual Machine has 1 Tera on its HD!!
Well, looking for some information on the Internet, I have found some interesting tips. According to that, Cisco Prime wrongly allocate the /opt partition sometimes. In my case, it has reserved 120 G and was using 60%. That´s the problem.
ade # df -h
Filesystem Size Used Avail Use% Mounted on
/dev/mapper/smosvg-rootvol
3.8G 295M 3.4G 9% /
/dev/mapper/smosvg-storeddatavol
9.5G 151M 8.9G 2% /storeddata
/dev/mapper/smosvg-localdiskvol
29G 235M 27G 1% /localdisk
/dev/sda2 97M 5.6M 87M 7% /storedconfig
/dev/mapper/smosvg-home
93M 5.6M 83M 7% /home
/dev/mapper/smosvg-optvol
120G 68G 46G 60% /opt
/dev/mapper/smosvg-varvol
3.8G 115M 3.5G 4% /var
/dev/mapper/smosvg-usrvol
6.6G 1.2G 5.1G 19% /usr
/dev/mapper/smosvg-tmpvol
1.9G 36M 1.8G 2% /tmp
/dev/mapper/smosvg-recvol
93M 5.6M 83M 7% /recovery
/dev/mapper/smosvg-altrootvol
93M 5.6M 83M 7% /altroot
/dev/sda1 485M 18M 442M 4% /boot
tmpfs 12G 6.0G 5.8G 52% /dev/shm
The solution proposed was resize that partition. It is possible? Well, some time ago I was not even aware that it is possible access the Unix side of the Cisco Prime!
The answer is: It is possible!
For those of you not really familiar with Cisco Prime, to get access to the Linux side, you can enable it firstly:
root_enable
Then, just type root at the command line and provide the root password. It is expected the following prompt:
ade #
From now we can move on:
ade # fdisk /dev/sda
The number of cylinders for this disk is set to 156650.
There is nothing wrong with that, but this is larger than 1024,
and could in certain setups cause problems with:
1) software that runs at boot time (e.g., old versions of LILO)
2) booting and partitioning software from other OSs
(e.g., DOS FDISK, OS/2 FDISK)
Command (m for help): p
Disk /dev/sda: 1288.4 GB, 1288490188800 bytes
255 heads, 63 sectors/track, 156650 cylinders
Units = cylinders of 16065 * 512 = 8225280 bytes
Device Boot Start End Blocks Id System
/dev/sda1 * 1 64 512000 83 Linux
Partition 1 does not end on cylinder boundary.
/dev/sda2 64 77 102400 83 Linux
Partition 2 does not end on cylinder boundary.
/dev/sda3 77 25497 204184576 8e Linux LVM
Command (m for help): n
Command action
e extended
p primary partition (1-4)
p
Selected partition 4
First cylinder (25497-156650, default 25497):
Using default value 25497
Last cylinder or +size or +sizeM or +sizeK (25497-156650, default 156650):
Using default value 156650
Command (m for help): p
Disk /dev/sda: 1288.4 GB, 1288490188800 bytes
255 heads, 63 sectors/track, 156650 cylinders
Units = cylinders of 16065 * 512 = 8225280 bytes
Device Boot Start End Blocks Id System
/dev/sda1 * 1 64 512000 83 Linux
Partition 1 does not end on cylinder boundary.
/dev/sda2 64 77 102400 83 Linux
Partition 2 does not end on cylinder boundary.
/dev/sda3 77 25497 204184576 8e Linux LVM
/dev/sda4 25497 156650 1053491125 83 Linux
Command (m for help): t
Partition number (1-4): 4
Hex code (type L to list codes): 8e
Changed system type of partition 4 to 8e (Linux LVM)
Command (m for help): p
Disk /dev/sda: 1288.4 GB, 1288490188800 bytes
255 heads, 63 sectors/track, 156650 cylinders
Units = cylinders of 16065 * 512 = 8225280 bytes
Device Boot Start End Blocks Id System
/dev/sda1 * 1 64 512000 83 Linux
Partition 1 does not end on cylinder boundary.
/dev/sda2 64 77 102400 83 Linux
Partition 2 does not end on cylinder boundary.
/dev/sda3 77 25497 204184576 8e Linux LVM
/dev/sda4 25497 156650 1053491125 8e Linux LVM
Command (m for help): v
Partition 1 does not end on cylinder boundary.
Partition 2 does not end on cylinder boundary.
2197 unallocated sectors
Command (m for help): w
The partition table has been altered!
Calling ioctl() to re-read partition table.
WARNING: Re-reading the partition table failed with error 16: Device or resource busy.
The kernel still uses the old table.
The new table will be used at the next reboot.
Syncing disks.
ade #
ade #
If you are following the instructions, pay attention to the letters in front of Command (m for help):
Type the same letters used here. It is expected that you end up with the same message.
Reboot the machine. As soon as it is back, use the following command to create a new partition:
ade # pvcreate /dev/sda4
Physical volume "/dev/sda4" successfully created
You can see what you just created:
ade # vgdisplay
--- Volume group ---
VG Name smosvg
System ID
Format lvm2
Metadata Areas 1
Metadata Sequence No 12
VG Access read/write
VG Status resizable
MAX LV 0
Cur LV 11
Open LV 11
Max PV 0
Cur PV 1
Act PV 1
VG Size 194.72 GB
PE Size 32.00 MB
Total PE 6231
Alloc PE / Size 6231 / 194.72 GB
Free PE / Size 0 / 0
VG UUID 1TBYXf-d59o-mpCo-88Yj-MjjO-paCV-7WIsV
The next step is add this brand new partition to /opt:
ade # lvextend /dev/mapper/smosvg-optvol /dev/sda4
Physical Volume "/dev/sda4" not found in Volume Group "smosvg"
ade #
As we can see above, we got an error. This can be fixed with the following command:
ade # vgextend smosvg /dev/sda4
Volume group "smosvg" successfully extended
And the 'grand finale':
ade # lvextend /dev/mapper/smosvg-optvol /dev/sda4
Extending logical volume optvol to 1.10 TB
Logical volume optvol successfully resized
ade # resize2fs /dev/mapper/smosvg-optvol
resize2fs 1.39 (29-May-2006)
Filesystem at /dev/mapper/smosvg-optvol is mounted on /opt; on-line resizing required
Performing an on-line resize of /dev/mapper/smosvg-optvol to 295665664 (4k) blocks.
ade # df -h
Filesystem Size Used Avail Use% Mounted on
/dev/mapper/smosvg-rootvol
3.8G 295M 3.4G 9% /
/dev/mapper/smosvg-storeddatavol
9.5G 151M 8.9G 2% /storeddata
/dev/mapper/smosvg-localdiskvol
29G 235M 27G 1% /localdisk
/dev/sda2 97M 5.6M 87M 7% /storedconfig
/dev/mapper/smosvg-home
93M 5.6M 83M 7% /home
/dev/mapper/smosvg-optvol
1.1T 67G 970G 7% /opt
/dev/mapper/smosvg-varvol
3.8G 117M 3.5G 4% /var
/dev/mapper/smosvg-usrvol
6.6G 1.2G 5.1G 19% /usr
/dev/mapper/smosvg-tmpvol
1.9G 36M 1.8G 2% /tmp
/dev/mapper/smosvg-recvol
93M 5.6M 83M 7% /recovery
/dev/mapper/smosvg-altrootvol
93M 5.6M 83M 7% /altroot
/dev/sda1 485M 18M 442M 4% /boot
tmpfs 12G 6.0G 5.8G 52% /dev/shm
This concludes the objective of this article. Resizing Cisco Prime partition. As mentioned above, it is expected that everything works fine but sometime we have this situations. Most probably you´ll not find anything about it on Cisco docs. So, this information is very precious!
Monday, April 6, 2015
Multicast Over Wireless
We had previously discussed here about Multicast PIM-Sparse Mode . That article has covered almost everything about Multicast in its more usual form. But, this intend to be a CCNP Wireless subject and as such, where is the Wireless part of it ? Well, I decided to divide this subject in two parts and here we will take a close look in the Wireless part of Multicast.
Actually, the Wireless part is not so large as Multicast in general, but, it has some very interesting theory.
Sadly we are not going to have any practical experience. I am still having problems in getting a LAB running for Wireless. Although a Wireless Lan Controller is relatively simple to acquire due Virtual WLC, it is not possible to virtualize an Access Point and I am not willing to afford a Cisco AP for now.
I have the possibility to use a LAB inside the company I work for, but, I don´t really believe it is too much important for now. Even though I like to much to see packets going back and forth, it is perfectly possible get a very good grasp through the theory.
Going to the point, Multicast over wireless is not something very common. I hope to find an opportunity to handle such thing in a project out there, but, so far, it is just theory for me.
But, as Wireless technology becomes more and more faster, it is more and more common to see applications like voice and video over wireless. Consequently, multicast will very important in those scenarios.
Starting up with the way multicast behaves over Wireless, lets say that Multicast is not enable by default in a Cisco Wireless Lan Controller. It is right to affirm that packets coming from wired network will be dropped if they are multicast packet. Although multicast packet coming from the Wireless network will be perfectly forwarded to the wired network. This dont make any sense but it is the way Cisco organized things in a default Wireless deployment. The reason for that is beyond this article´s scope.

By clicking on "Enable Global Multicast Mode" this WLC will be Multicast ready and will forward multicast traffic back and forth. Once multicast is enable, you need to choose between two mode. It can be Unicast or Multicast modes. By choosing Unicast mode you are saying to the WLC to transform each multicast packet coming from the Wired network in a unicast packet , encapsulates it into a CAPWAP protocol and send them to each AP. APs then take each packet, decapsulate it and send to the client. As you can see, this process consumes a lot of bandwidth and CPU process. It is even not supported for some WLC models. But, Cisco keeps this mode available in the event of the network between WLC and APs does not support multicast at all. I mean, if the switches connecting WLC and APs only support unicast packet, this mode can allow for multicast between WLC and APs.

In the same window, by choosing Multicast mode, it will be requested to inform an IP Multicast Address and Cisco recommends from the range 239.129.0.0 to 239.255.255.255.
This IP will be used between WLC and APs. Now, when an AP joins on the WLC, it will be joining to this Multicast group. For now on, the behavior of the WLC related to multicast will change drasticaly. Every time it receives a multicast packet, it will encapsulate the multicast packet into a CAPWAP packet and send it once. All APs will receive the multicast as a CAPWAP packet, decapsulate it and then, forward to the clients. This new approach saves a lot of time and resource.

Take care to dont mess it up. We are talking about two multicast group here right ? One multicast group is formed between WLC and APs, as explained earlier. Here represented by the IP 239.129.1.5. But, you may notice that inside the packet encapsulated by the WLC, there is another multicast packet, here represented by the IP 239.130.0.1. After all, the whole process is about client inside a wired or wireless network trying to exchange multicast packet. The reasons are beyond the scope here.
Something happens here. According to the multicast group in which the client belongs to, WLC will create Multicast Group Identifier (MGID). MGID associates client VLAN, client MAC address in a common database for a specific group.
We can have as many MGID as we have clients in differents multicast group. Just to make it clear, if we had 50% of clients belonging to a multicast group and the other 50% to a second multicast group, WLC will create two MGID.
Another point that needs to be discussed is about IGMP Snooping. IGMP Snooping is disable by default and it causes a specific behavior. By keeping it disabled, clients from Wireless side is able to be seeing by uplink routers on the wired side.It is unecessary explain the problems related to this scenario.
By enabling IGMP Snooping, WLC takes care about everything. Flow coming from wired and/or wireless side, will be stoped at the WLC. WLC starts to send its own multicast packets to uplink router using its dynamic interface as a source. WLC become the client from the uplink router point of view.
It is very easy to realize that this scenario is far more organized and secure than the previous one.

This kind of scenario is reason for many many question. It is very important to understand and memorize this flow.
Well, as stated before, MGID is related to the VLAN. It turns out that some WLAN is configured with interface group. Each interface is part of different VLANs. In a normal behavior, if clients belonging to different VLANs, WLC should send the same packet as many times as the number of VLANs. To avoid this behavior, you must enable "Multicast VLAN" feature.
There is a situation related to QoS and Multicast. QoS will subject of another article. I promess go deeper on this because it is very important.
For now, lets discuss some specific situation where QoS may interfere with Multicast. It turns out that Multicast packet is sent at the highest mandatory data rate. Lets consider that 24 Mbps is a mandatory datarate for a specific cell. Therefore, client may be on the edge of the cell and as such is not able to demodulate packet at 24 Mbps. That´s why is it important set up mandatory data rates according to the lower speed of the cell. In voice environment, it causes an issue called "one way audio".
The contrary may happen as well. A client positioned close to the AP may sand multicast data at 100 Mbps to AP but will receive at the mandatory datarate. As video quality degrade at lower speed, we can have problem as well. Cisco allows overcome this issue by enabling VideoStream.
The last situation we are going to discuss here is about roam and multicast. There are two possible scenario. WLC in the same VLAN and in different VLAN.
In the first scenario, everything occurs seamless. When a client moves to another WLC, all the information related to that client is moved to the other WLC.
In the second scenario, things happens just like assynchronous traffic flow. The WLC that generate the MGID keeps it as yours and forwards the traffic to the "anchor' WLC.

One picture is worth a thousand words.
That´s all for now. Multicast over wireless, as mentioned above, is not too much used. But in case of find some deployment out there, we have a good start here.
Playing With Windows - Find out Serial Number
Today I took my daughter's notebook to the assistance. It turns out that the representative was not able to read the serial number. the label was a little bit damaged.
Well, after waiting for some time and didn't see any solution for that, I took the notebook back, turned it on and performed the following command:
wmic bios get serialnumber
The result is like that:

It was very useful, once without the serial number it would not be possible to open a ticket case.
Sunday, March 29, 2015
N +1 HA
Uma das coisas que eu mais prezo em minha vida profissional é minha 'curva de aprendizagem'. E acredito que podemos e devemos mantê-la o mais íngreme possível.
Em meu trabalho anterior, por uns dois anos, minha curva era quase uma reta vertical. Eu sabia pouco de Cisco, quase nada. Após um período a reta foi ficando curva e a curva cada vez mais transformando em uma reta, só que agora horizontal. A mudança de emprego não foi exatamente por isso mas é muito bom sentir que estou novamente tendo a oportunidade de aprender muito a cada dia.
Mantendo o propósito do blog, aqui vai mais algumas 'lessons learned'. O primeiro desafio que encontrei foi realmente inusitado. Algo que pode nunca vir a ocorrer novamente. Como eu tive que fazer um downgrade em um WLC (Wireless Lan Controller) da versão 7.6.130 para a versão 7.4.121, para manter a mesma versão das demais WLC. Quando eu fui jogar o software na WLC, recebi o seguinte erro:
"
Transfer failure : Upgrade from LDPE to non LDPE software is not allowed.For DTLS encryption support,
DTLS license should be applied.Please download AIR-CT5500-LDPE-K9-x-x-x-x.aes image instead
"
Eu não tinha visto esse log ainda e certamente é pouco provavel que veja tão logo. LDPE WLC´s não deveriam estar aqui no Brasil. Na verdade em nenhum outro lugar além da Rússia. Se olharmos na página de download da Cisco, essa mensagem fica bem clara:

O motivo pelo qual essa WLC veio parar em minhas mãos pode ser muitos e foge do escopo. O fato é que eu tive que lidar com isso.
Essa diferença fica bem evidente se olharmos através de um comando:
(Cisco Controller) >show sysinfo
Manufacturer's Name.............................. Cisco Systems Inc.
Product Name..................................... Cisco Controller
Product Version.................................. 7.4.121.0
Bootloader Version............................... 1.0.20
Field Recovery Image Version..................... 7.6.95.16
Firmware Version................................. FPGA 1.7, Env 1.8, USB console 2.2
Build Type....................................... DATA + WPS + LDPE
(Cisco Controller) >show sysinfo
Manufacturer's Name.............................. Cisco Systems Inc.
Product Name..................................... Cisco Controller
Product Version.................................. 7.4.121.0
Bootloader Version............................... 1.0.20
Field Recovery Image Version..................... 7.6.101.1
Firmware Version................................. FPGA 1.7, Env 1.8, USB console 1.27
Build Type....................................... DATA + WPS

Para ativar a licenças basta ir em Management >Software Activation:

É possível entrar em cada licença e ativá-la. Quando ela ainda não está ativa, será mostrado "EULA not Accepted" em status.

É preciso estabelecer uma prioridade e clicar em set priority. Será mostrado um pop up para que seja realizado o aceite do EULA e consequentemente, será ativado a licença.
A configuração do N + 1 HA em si é extremamente simples. Na WLC primária, é preciso fazer o apontamento da WLC secundária:

É preciso preencher os campos Backup Primary Controller name e IP address. É possível inserir uma segunda WLC de Backup.
Na WLC de Backup, é preciso colocá-la como Secundária com SSO em disable:

Não é preciso configurar nenhum endereçamento IP, apesar de aparecer um pop up reclamando.
Apenas mais uma configuração é recomendada. Em cada AP é importante estabelecer em High Availability, as WLC disponíveis em termos de Primary,Secondary e Tertiary:

E encerramos por aqui. Como podem ver, a configuração de N + 1 HA é muito simples. Com um pouco de sorte é possível encontrar situações como essas que encontrei.
Espero que essas informações como sempre possa auxiliar alguém.
Em meu trabalho anterior, por uns dois anos, minha curva era quase uma reta vertical. Eu sabia pouco de Cisco, quase nada. Após um período a reta foi ficando curva e a curva cada vez mais transformando em uma reta, só que agora horizontal. A mudança de emprego não foi exatamente por isso mas é muito bom sentir que estou novamente tendo a oportunidade de aprender muito a cada dia.
Mantendo o propósito do blog, aqui vai mais algumas 'lessons learned'. O primeiro desafio que encontrei foi realmente inusitado. Algo que pode nunca vir a ocorrer novamente. Como eu tive que fazer um downgrade em um WLC (Wireless Lan Controller) da versão 7.6.130 para a versão 7.4.121, para manter a mesma versão das demais WLC. Quando eu fui jogar o software na WLC, recebi o seguinte erro:
"
Transfer failure : Upgrade from LDPE to non LDPE software is not allowed.For DTLS encryption support,
DTLS license should be applied.Please download AIR-CT5500-LDPE-K9-x-x-x-x.aes image instead
"
Eu não tinha visto esse log ainda e certamente é pouco provavel que veja tão logo. LDPE WLC´s não deveriam estar aqui no Brasil. Na verdade em nenhum outro lugar além da Rússia. Se olharmos na página de download da Cisco, essa mensagem fica bem clara:
O motivo pelo qual essa WLC veio parar em minhas mãos pode ser muitos e foge do escopo. O fato é que eu tive que lidar com isso.
Essa diferença fica bem evidente se olharmos através de um comando:
(Cisco Controller) >show sysinfo
Manufacturer's Name.............................. Cisco Systems Inc.
Product Name..................................... Cisco Controller
Product Version.................................. 7.4.121.0
Bootloader Version............................... 1.0.20
Field Recovery Image Version..................... 7.6.95.16
Firmware Version................................. FPGA 1.7, Env 1.8, USB console 2.2
Build Type....................................... DATA + WPS + LDPE
(Cisco Controller) >show sysinfo
Manufacturer's Name.............................. Cisco Systems Inc.
Product Name..................................... Cisco Controller
Product Version.................................. 7.4.121.0
Bootloader Version............................... 1.0.20
Field Recovery Image Version..................... 7.6.101.1
Firmware Version................................. FPGA 1.7, Env 1.8, USB console 1.27
Build Type....................................... DATA + WPS
Podemos ver que no primeiro exemplo, temos a presença de LDPE, enquanto que no segundo não vemos.
Vale salientar que é possível converter um device LDPE para um não-LDPE e eu tentei fazê-lo mas sem sucesso. Porém, no meu caso, se tratava de um HA-SKU. Esse tipo de WLC é usada exclusivamente para backupe e não possui licenças, talvez por isso não tenha conseguido.
Como existe outra forma de lidar com isso, não perdi muito tempo tentando converter. Vale lembrar que todos esses procedimentos não ocorreram em LAB e sim em ambientes reais e com um tempo determinado de janela.
Enquanto você não contorna o problema, um segundo erro é mostrado nos logs:
*Mar 26 18:37:20.000: %CAPWAP-5-DTLSREQSEND: DTLS connection request sent peer_ip: x.x.x.x peer_port: 5246
*Mar 26 18:37:21.512: %CAPWAP-5-DTLSREQSUCC: DTLS connection created sucessfully peer_ip: x.x.x.x peer_port: 5246
*Mar 26 18:37:21.513: %CAPWAP-5-SENDJOIN: sending Join Request to x.x.x.x
*Mar 26 15:36:42.000: %CAPWAP-5-DTLSREQSEND: DTLS connection request sent peer_ip: x.x.x.x peer_port: 5246
*Mar 26 15:37:12.000: DTLS_CLIENT_ERROR: ../capwap/base_capwap/dtls/base_capwap_dtls_connection_db.c:2051 Max retransmission count reached!
*Mar 26 15:37:41.999: %DTLS-5-SEND_ALERT: Send FATAL : Close notify Alert to x.x.x.x:5246
*Mar 26 15:37:42.000: %CAPWAP-3-ERRORLOG: Go join a capwap controller.
Para resolver o problema, vá em Security > AP Policies é possível desmarcar a opção Accept Self Signed Certificate. Isso deverá resolver o problema.
Uma última dica importante. Não esqueça de ativar a licença. Ainda que uma WLC SKU-HA não possui licenças definitivas, elas possui licença temporária e precisa ser ativada, do contrário os APs não irão se associar e mostrará o seguinte erro:
"Refusing Discovery Request from AP - limit for maximum APs supported 0 reached"
É possível entrar em cada licença e ativá-la. Quando ela ainda não está ativa, será mostrado "EULA not Accepted" em status.
É preciso estabelecer uma prioridade e clicar em set priority. Será mostrado um pop up para que seja realizado o aceite do EULA e consequentemente, será ativado a licença.
A configuração do N + 1 HA em si é extremamente simples. Na WLC primária, é preciso fazer o apontamento da WLC secundária:
É preciso preencher os campos Backup Primary Controller name e IP address. É possível inserir uma segunda WLC de Backup.
Na WLC de Backup, é preciso colocá-la como Secundária com SSO em disable:
Não é preciso configurar nenhum endereçamento IP, apesar de aparecer um pop up reclamando.
Apenas mais uma configuração é recomendada. Em cada AP é importante estabelecer em High Availability, as WLC disponíveis em termos de Primary,Secondary e Tertiary:
E encerramos por aqui. Como podem ver, a configuração de N + 1 HA é muito simples. Com um pouco de sorte é possível encontrar situações como essas que encontrei.
Espero que essas informações como sempre possa auxiliar alguém.
Subscribe to:
Comments (Atom)