Wednesday, May 11, 2016

Google Drive on CentOS


Today information's place is the Cloud. Every thing looks like to be sending to the Cloud. Although Cloud is just someone´s else computer, actually it is a great improvement in many sense.
  Recently my notebook´s HD just gone! I simply lost everything I had. I was working in a bunch of scripts and simply lost everything. I had no backup!.
 Well, based on this disaster, I decide to write this post. Here we are going to learn how integrade CentOS 2.6.32-279.el6.i686  with Google Drive and, from Command line interface, upload and/or download files. Google allows for 18 Gigabytes with no charge, which is a lot of space and we have no reason to do not use it.
 Considering you have a perfectly installed and configure CentOS CentOS-6.3-x86, we can keep going:
 The first thing to do is download the bynary from Google. Currently, the URL https://github.com/prasmussen/gdrive#downloads.
is ok. The option gdrive-linux-386 is the correct for this Operational System.
 You can right click and get the URL, then, use wget to donwload:

wget -O drive https://docs.google.com/uc?id=0B3X9GlR6EmbnLV92dHBpTkFhTEU&export=download


  The -O option permits you to change the downloaded file name, otherwise, the file names will look like a string. After that, copy file to /usr/sbin and give it permission:

mv drive /usr/sbin/drive  

chmod 755 /usr/sbin/drive 

 Now you have Google drive installed on you system and we have one more step to do:



 The command used here was "drive about". This command is for an Authentication step which is pretty simple. It gives you an URL and as bellow to enter a Code. As soon as you copy and paste that URL in a Browser, you´ll be asked to permit the operation:


By doing so, you´ll be presented to another page where a string of characters will be presented:


Copy that string and paste on the command line:


After that, the authentication process is finished:



You can now happily send your file to the Cloud and get those back according to your wishes.
 To upload a file just type "drive upload 'file name'" and it´s done. Simple like that.
 To download a file, one step more is necessary. You can´t just type "drive download 'file name'" because you are looking for something out there on the Internet. You need to pass out a reference.

The way I do that is:


By clicking with the right button over the file you want do download, you can see the URL for that file. 


As we can see from the image above, the file´s URL have a string id and this string can be used as a parameter on the download command. Just type "drive download 'string'"and you are ready to download a file from Google drive to you machine.
 You can also use de command "drive list". This command will show you all files currently on your Google drive and the string for each file


This is it. Pretty simple but really helpful. Now you can backup your files into the Cloud.


Thursday, March 31, 2016

Air Time Fairness - ATF


The coolest feature Cisco had ever added to a WLC, in my opinion, is ATF. This feature was introduced in 8.1MR2 code 8.1.120.0 and ATF Phase-2 (Client fair Sharing) is available in 8.2 code. This is something that was missing on Wireless gears. 
  Why ATF is so cool ? Because it performs QoS in the Wireless part of the network, not in the Wired, as usual.
 What ATF really do is create budget and attribute those budget to SSIDs. When a frame is about to be transmitted, ATF verifies the SSID budget and evaluate if the SSID has enough airtime to transmit that frame. If negative, the frame can be dropped or deferred. 
  The drop action as it is and the deferred rely on the Queues for store frames for a certain amount of time and transmit as soon as the SSID has budge.Therefore, it has a limited time period and the frame may be dropped in case no budge release.
 The over wall mechanism actually is not too much different from regular QoS mechanism but the possibility to control frame transmission at Wireless side, it is revolutionary.
  One interesting information is that ATF act only in downstream traffic and the reason for that is obvious, Access Point can not control upstream traffic. Maybe in the future, some protocol could allows for upstream ATF but it depends on Client intelligence.
 the applicability of ATF is also obvious and what makes it so amazing is how easy it is to deploy. Conventional QoS depends on the whole network to be ready, while ATF, wireless Engineer can do the job by himself. Of course, this doesn´t replace the conventional QoS as mentioned above.
  
  The following list, presents the Capabilities and was taken from:
"b_Air_Time_Fairness_Phase1_and_Phase2_Deployment_Guide"

Available on cisco.com.


ATF Functionality and Capabilities
• ATF policies are applied only in the downlink direction (AP transmitting frames to client). Only airtime in the downlink direction,
that is AP to client, can be controlled accurately by the AP. Although airtime in the uplink direction, that is client to AP, can
be measured, it cannot be strictly controlled. Although the AP can constrain airtime for packets that it sends to clients, the AP
can only measure airtime for packets that it ‘hears’ from clients because it cannot strictly limit their airtime.

• ATF policies are applied only on wireless data frames; management and control frames gets ignored.

• When ATF is configured per-SSID, each SSID is granted airtime according to the configured policy.

• ATF can be configured to either drop or defer frames that exceed their airtime policies. If the frame is deferred, it will be buffered
and transmit at some point in the future when the offending SSID has a sufficient airtime budget. Of course, there is a limit as
to how many frames can be buffered. If this limit is crossed, frames will be dropped regardless.

• ATF can be globally enabled or disabled

• ATF can be enabled or disabled on an individual access point, AP group or entire network

• ATF will be supported on the 1260, 1570, 1700, 2600, 2700,3700,3600,3500, series access points in local and FlexConnect
mode. (Mesh mode not supported)


• ATF results and statistics are available on the wireless controller.


 Some more important information about ATF:
It is disabled by default. Can be configured as monitor mode and Policy mode and can be applied per AP, per AP group or All APs.


Tuesday, March 29, 2016

Playing With Python - A bit more!


 I´m working in a Python script and my objective is:


1-Access to a Wireless Lan Controller;
2-Perform some commands, for example, "show ap summary";
3-Save the output in a file;
4-Open the file;
5-Get the AP hostname and put in a variable.;
6-Perform the command "show ap auto-rf 802.11b 'AP name';
7-Save the output in a file;
8-Get information about Wireless
9-Show it in some format;

So far, I have accomplished 4 out of 9 steps. My script looks like this:

#!/usr/bin/python
from Exscript.util.interact import read_login
from Exscript.protocols import SSH2
from Exscript import Account

user    = "xxxxx"
passwd  = "xxxxxxxx"
wlc_ip  = "xxxxxxxxxxxxx"

account = Account(user,passwd)
conn = SSH2()
conn.connect(wlc_ip)
conn.login(account)

conn.execute(user)
conn.execute(passwd)
conn.execute("config paging disable")
conn.execute("show ap summary")

print conn.response

f = open(wlc_ip, 'w+')


f.write(conn.response)

conn.send("logout")
conn.send("y")
conn.close()

 I am learning about Python file handling in order for accomplish what I want to do. 
 As soon as I have a progress, I will put here. If someone out there had any hint, will be very very nice!

************************************************************************

Well, I didn´t to much progress but I did some.

Now I am at step 5!

First, this piece of code, gives me only the APs hostname:


fin = open("fin.txt")
fout = open("fout.txt","w+")
for line in fin:
     if 'AIR'  in line:
         list = line.split(" ")
         fout.write(list[0]+'\n')


fin.close()
fout.close()

What it does is, it open the fin.txt file which is the file I got from WLC and Analise. If AIR in line, which means, only those lines with APs, separate by spaces and take the first element. As AP hostname is the first element, I am storing on the fout file the hostname of all APs.

ap = open("fout.txt")

some_ap = ap.readlines()
print some_ap[1]


ap.close()

The second part of code, takes the file created above and create a list in which each index will actually a hostname. The idea now is call the command
"show ap auto-rf 802.11b 'AP name'" and pass on each AP as argument. This command must be executed one by one, so , that´s why I need to be specific.

For sure a developer would lauch at my code and I believe it is too bad but for now it´s all I have.

When everything is working fine, I will try to be more elegant. 

+++++++++++++++++++++++++++++++++++++++++++++

May 28, 2016

A few days ago I have finished my script. I did it with a little help from a friend but I did the most part of it, so I am posting it as my code:

 Recapping my objectives:

1-Access to a Wireless Lan Controller;
2-Perform some commands, for example, "show ap summary";
3-Save the output in a file;
4-Open the file;
5-Get the AP hostname and put in a variable.;
6-Perform the command "show ap auto-rf 802.11b 'AP name';
7-Save the output in a file;
8-Get information about Wireless
9-Show it in some format;

Well, step 1 was accomplished using Exscript. First I tried with Paramiko directly but the odd behavior of Cisco WLC asking for user login twice, prevent me succeed with Paramiko.
 Exscript was a big asset once it allows me login in and preform commands.

 Step 4 was solved the same way. The "conn.execute" Exscript´s function do the job like a charm.

Steps 3, 4 and 5 was accomplished using Python file handling ability. Not that complicated.

The piece of code responsible for that, looks like this:


for line in extract_hostname:
    if 'System Name' in line:
        list = line.split(" ")
        show_hostname.write(list[2]+'\n')
        print ("The hostname is : " + list[2])
        i=list[2].strip()

First, the script performed the command conn.execute("show sysinfo"), because this command will bring the WLC hostname somewhere.

The "show sysinfo" command output was stored in a file called "wlc_hostname"

get_hostname  = open("wlc_hostname", "w+")
get_hostname.write(conn.response)

get_hostname.close()

Then, I created an variable to receive the file:

extract_hostname = open("wlc_hostname")

show_hostname = open("hostname", "w+")

Finally, the code above work on this file in order to find the hostname.

for line in extract_hostname makes the script look line by line. The WLC hostname is shown somewhere like this:

System Name...................................... XXXXXXXXXX

When ths script gets to this line, it splits the line and get the piece that contains the hostname. Stores the hostname in a list for future usage.

Well, all this was only to get the WLC hostname. As I intend to run this script among many WLC, I think it is a good idea to have each file as WLC hostname.

Therefore, my final goal was extract KPIs from WLC and save it in a CSV file. Then, the same methodology was applied:

The command "Show ap auto-rf 802.11a/b 'ap hostname' is passed to WLC via "conn.execute", the hole output was written in a file with "conn.response" and then the file was edited with the piece of code bellow:


x = []
fin = open("XXXXXXXXXX")
fout = open("wlc_ip"+"-" + timestamp + ".txt","w+")

print "Creating a list of hostnames..."

for line in fin:
      if 'AIR'  in line:
         list = line.split(" ")
         x.append(list[0]) 


for line in x:
         conn.execute("show ap auto-rf 802.11a " + line)
         fout.write(conn.response)         


fin.close()
fout.close()

The code takes the output row from "show ap summary", read the row, find out the word 'AIR' and sttract the hostname, storing it in a variable called 'line'.
Once we get the hostname, a for statement run over the list "x" using the command "show ap auto-rf 802.11a and instead using the AP´s hostname, use the variable "line". For each loop, the information from one AP was got.

  The result is a very long file separated by AP. After that a similar script gets the KPIs in CSV format, as we can see bellow:

APhostname,RADIO_TYPE_80211a,0,0,1,2,1,0,0,0,0,0,0,2,0,0,0,0,0,0,0,0,2,0
APhostname,RADIO_TYPE_80211a,0,0,0,1,1,0,0,0,0,1,0,0,0,0,0,0,0,0,0,1,0,0
APhostname,RADIO_TYPE_80211a,0,0,2,0,1,0,0,0,0,0,0,0,0,0,0,0,0,0,0,0,0,0
APhostname,RADIO_TYPE_80211a,0,0,0,1,1,0,0,0,1,0,0,0,0,0,0,0,0,0,1,0,0,0
APhostname,RADIO_TYPE_80211a,0,0,0,1,1,0,0,1,0,0,0,0,0,0,0,0,0,1,0,0,0,0
APhostname,RADIO_TYPE_80211a,0,0,1,10,1,0,0,0,2,2,4,2,0,0,0,0,0,0,2,6,2,0
APhostname,RADIO_TYPE_80211a,0,0,1,5,1,0,0,1,1,1,2,0,0,0,0,0,0,1,1,3,0,0
APhostname,RADIO_TYPE_80211a,0,0,0,3,1,0,0,1,0,0,0,1,1,0,0,0,0,1,0,0,2,0
APhostname,RADIO_TYPE_80211a,0,0,0,0,0,0,0,0,0,0,0,0,0,0,0,0,0,0,0,0,0,0
APhostname,RADIO_TYPE_80211a,0,0,13,2,1,0,0,0,0,2,0,0,0,0,0,0,0,0,0,2,0,0
APhostname,RADIO_TYPE_80211a,0,0,2,12,1,0,0,1,0,2,4,3,1,0,1,0,0,1,1,4,5,1

Each comma-separated value represents one KPI retrieved from the WLC. PKIs like air time utilization, "AP Name","Radio Type","Receive Utilization","Transmit Utilization","Channel Utilization","Attached Clients","Power Level","RSSI", "SNR",etc.

Why don´t use Cisco Prime instead? Those information can be shown with reports, doesn´t it? Yes, it is.

What I am looking for a system to control Wireless network behavior using firstly command line interface. With one command I can see how things are going on.I don´t need to access Prime GUI and export reports. Someone could say, then schedule reports! The problem with reports schedule is the period of one hour per report. In one hour we can have a lot of changes in the network.
 The script can get information at any time I want, I can reduce the frequency and this can be every 10 minutes or every each 5 seconds. I can store this results in a database for example. Actually, there is no limit at all!!


Wednesday, March 23, 2016

CCI and SNR on Wireless Network


Lately, I´ve been looking for putting some light over some obscure subject in my head about CCI and SNR. We are planing to deploy a very large Wireless Network and consequently, we need to be prepared for very crowded spaces.
  It turns out that CCI , the short for Co-Channel Interference, is a natural consequence when it comes to deploy many Access Points in a relatively small area. There´s a equation related to crowded space that is not easy to solve. If you have a space in which you´ll have too much people on it, you consequently will need too many Access Points in order for accommodate all those peoples. This is known as "Coverage for performance".Once you try to accommodate too many Access Point together, you´ll have problem with CCI in the 2.4 frequency band or even 5.0 Gigahertz.
  The other factor is SNR. Well, SNR is the short for Signal to Noise Ratio and, as its name states, Ratio means a comparative value between to things. This things is Noise floor and Power.
  The fact is , when we are planing  wireless network, we have to have some north in order to ensure that the network will offer a good users experience . Once Wifi KPIs is not well defined as it is in mobile, SNR is considered to be a very good parameter when it comes to have a reliable network.
 When we go through papers, we often see value like -67 dBm RSSI ate the edge of the Cell and 35 dB SNR. An environment with such KPIs, is considered to be good for any kind of transmission over Wireless network.(Video, voice and data).
  Therefore, this is not the only one important  thing to consider. Actually, it is really easy to achieve a good SNR if you have the desired resource available. I mean, if you can spread out as many Access Point as necessary.


 You probably will get astonished if I said that one and only one Access Point installed at the right place and height can provide at least -90 dBm RSSI for a whole stadium. For sure this is just a curiosity, but you wont to be wrong in your design if you followed  the figure above. This is in fact, the correct deployment for a really good Wireless environment. As we can see, we have Cells with RSSI equal to -67 dBm at the edge and consequently, 35 dB SNR. We also have the necessary distance between cells accounting for 20 dBm in Signal Strength between two cell. This is necessary because, if an Access Point hears another Access Point with a signal strength greater than 19 dBm , this means both Access Point can transmit without to provoke CCI.
  The problem is that this cells will repeat over and over around an area and, most important, Access Point cells is not round like that. Considering the obstacle and others factors, at the end of the store, it is really complicate deploy 2.4 band and keep the network healthy.
 Back to CCI and SNR, the conclusion is that, we need to have a good SNR in the environment but this is not enough. A good SNR with a poor frequency reuse allowing for CCI, will result in users with five bars wireless client and poor wireless connection.
  I will explain CCI in another opportunity. By now, that´s all. Keep in mind that bad SNR will make you fail at all but, good SNR does not guarantee success.


Wednesday, September 9, 2015

HotSpot-2.0/802.11u/Passpoint

Yeah! Long time no writing but still hacking out there. I am really busy this days. Six weeks giving training for a big customer, consuming all the time I have, almost all the time. The time remaining, I need to dedicate to my lovely family. Well,give training is an amazing opportunity to learn, hold what you know in your head and learn more. It is an very good way to keep stuff alive.
 The newer interesting subject is Hotspot. This is actually new. Was ratified early 2011 and it still being deployed  for large companies. The fact is, hotspot takes wifi to a very interesting level. Its integration with Cellular network makes thing really nice.
 I am in range to understand a lot of new concepts and the idea is write it down here for study purpose.
 Basically Hotspot adds new functionalities to the traditional wifi technology by adding some activities after wifi pre activities. I mean, in a traditional wifi environment, you see the SSID being spread out there, you try to connect to that SSID using some kind of security or not and end up with a connection.
 So far so good, after all, being connected will be always the objective or not ? But, it turns out that the process just described was never practical. You need to make the move. You always need to connect in some SSID.
 What about Cellular Network ?  Do you need to ask for you cell phone gets connected ? you don´t. Once you are in range with any network, you will be able to connect and use the service seamlessly. How is that possible ? and it is possible to have such set up on the Wifi world ?
 The answer for those question will come later in new post.

Cheers! Wireless have been demystified in my head more and more. It is expected that in a few time I ´ll  not see too much challenge by deploying wireless network. But, thanks to the market, new stuff are popping up and this keeps me busy.


Friday, June 26, 2015

Cisco UCS : The nitty-gritty

Well, as many of you may know, some time ago Cisco decided to build its own server hardware. As I remember, it used to use HP server hardware for quite sometime and I can remember that when it came to the public that Cisco will launch its own hardware, was a  big commotion on the market. For some time it was the News on the IT area.
 At that time, although I was pretty interested, it was happening thousands Miles away from me. After this rupture, Cisco has launched  the UCS line. Still for long time I heard something here and there about UCS but it was still far away. Until last days.
 The company I work for, wisely, decided that we should be able to setup our UCS and this should not be a Data Center team activity. Oh!! that´s nice to hear! and here we go! Setup, from scratch, my first UCS in a  Data Center.
 So far so good. Data Center was not something new for me and devices by devices I have had seen a lot last times. But, it is not that simple.
  When it comes to UCS from scratch you have basically two option. First you can setup a DHCP server on his own machine, plug you machine on the UCS Management port , observe which IP address it gets, put that IP in a web browser and you will might see a interface like that:


Cisco Integrated Management Controller is an interface where you can setup IP address and others few parameters for your box.
 Therefore, if you have not a DHCP server available, you can reach the same result by pressing F8 during the boot and it will brings you to the same CIMC, but now, with more simple interface.


 The picture shows that the CIMC actually gets an IP address, probably from an DHCP server. But what we want to show here is the possibility in press F8 key. It will get you to the following interface:


Once you gets there, just configure all the parameters you consider necessary and press F10 to save. After that, go to the browser and type in the IP address you just choose for your box. This will take you to the same step we were before.


We can see from the picture above a small icon where we can see in front of it "Launch KVM Server". This magic button allows you go a step further on building your environment. After all, you cannot only bring a box up and it is done!
 Well, I can´t for sure affirm that in all cases the behavior from here will be the same and this is not my intention, but, in my case when I pressed that button, my browser downloaded a java file on my local drive.  If this is your really first UCS setup, this part will economize you some times.


The File shown on the picture "viewer.jnjp..." is the file download when I pressed KVM button. What the hell I do with it ? It is expected that you rename it and strip out everything after viewer.jnlp.
 After that, you will get a little shortcut like this one:


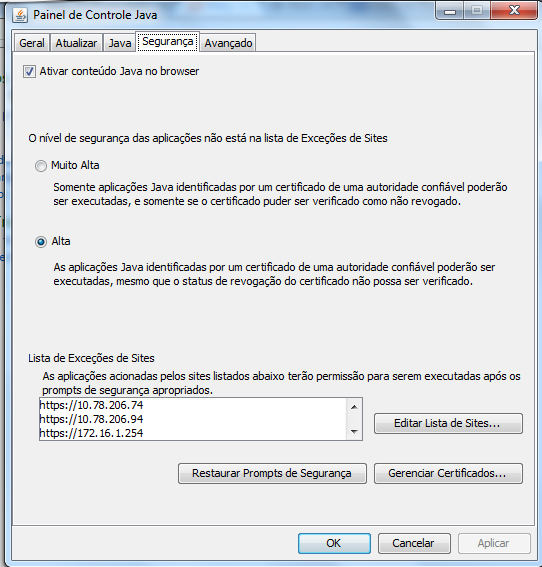
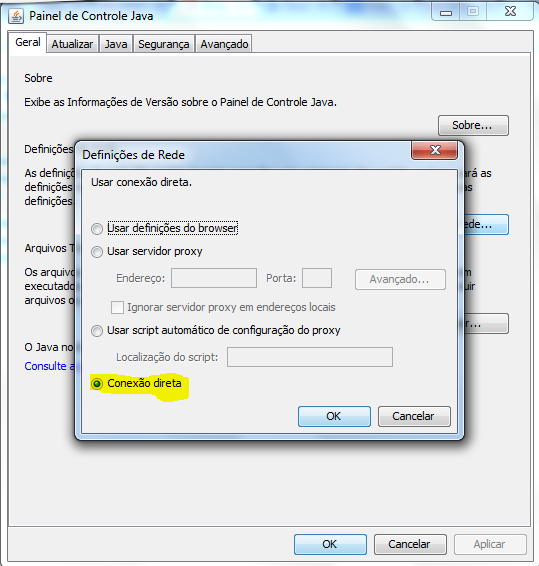
Just execute the Java program and you should finished with a KVM interface console. If you cannot , verify your Java setup.


This is for a Portuguese PC but you can find it out in our native language.

After that, you will end up with a KVM window. It is simple and I have not an example right here. You need to find your virtual Media. Reboot the server, change the boot sequence to the virtual Media you just mapped and proceed with the installation. It can be an VMWare ESXi environment, where you can setup any others Virtual machine or it can be an .ISO image for a Operational Systems.
  Then we came to an end with this beauty history about setting up a brand new Cisco UCS. Sadly, not everything is flower. I had some interesting problem and I'd like to share in another article.

Cheers.


Monday, May 18, 2015

Litle Bit of Shell Script - Part 2


I Just made a change in the script. Actually, the script was working just fine but I had only one single problem with it. If I had two file on the directory to be compressed, the script would make only one compressed file. Although this situation might not happen in the environment I'd like to implement this script, I was not comfortable with it. Tried many ways to overcome this problem but, in fact, the original script with only one change was able to give me the result I wanted.
The original script was:

NOW=$(date +"%m-%d-%Y")
FILE="Prime-Backup.$NOW.tar.gz.$$"
tar  -zcf  $FILE  $files

Then a change to :

NOW=$(date +"%m-%d-%Y")
    tar -cz -f "$file".$NOW.MyFile.tar.gz  "$file"

I Keep the variable "NOW" because it is important to define the file's date but I changed the line that was screw up the results. As I was putting the final file in a variable called $FILE, I always had only on file as output. As soon as I specify the $file, the script start to compress by file. To keep things organized, I put the Date command inside the file's name. Now is complete. Everything the script supposed to do, it finally does.


#!/bin/bash

#Create a reference file
touch -d -20days "/tmp/20dayref.$$"

#Go to the directory in which my files resides
cd /home/pendrive

#Looking for file with specific characteristics
find . -type f  -name 't*'  -print | while read file

#if found, do
do
#If file is newer than the reference file, and if has the specific characteristics
    if [[ ("$file" -nt "/tmp/20dayref.$$") && ( "$file" =~ \.txt$) ]]

    then

#Compress the file using the current date and some specific information

echo "File": $file " is newer  than 20 days"
    echo "Compacting...."
    NOW=$(date +"%m-%d-%Y")
    tar -cz -f "$file".$NOW.MyFile.tar.gz  "$file"

#For clean up metter, delete original  files
    echo "Deleting original backup file...": $file
    rm $file

#If file is older than the reference file

elif [[ "$file" -ot "/tmp/20dayref.$$" ]]

then

#Delete it

    echo "File": $file "is older than 20 days"
    echo $file
    echo "Deleted  permanently...."
    rm $file

else
#If nothing is found to do, just print the success message
echo "Job successfully completed!!!!"

    fi
done

Friday, May 15, 2015

Litle Bit of Shell Script


I've written posts about Python and Python is in fact a great programming language. But, recently I needed solve a situation in which Shell Script was more indicated:

Thanks to the excellent forum about Script :

http://www.unix.com/

Instead of write a whole new post, I'm gonna put here the post I put there. The conclusion, let´s say:


"I'm sharing my code here. Sure it is not elegant but it is doing exactly what I need. So, it is useful !
I have a server that makes backup each 7 day in a FTP server. I want to keep only 3 files and compacted.
The first time that this code will be executed, let´s say 7 days from here, it is expected that will have one file on the FTP server. Then, the script will only compact it.

Seven day after and the script will run again. This time, we will have two files : A new backup file from the server and a .gz file created last time.
I want to keep the .gz, since it has not 20 days yet and I want it compacted.

Later on, there will be situations which we will have a new backup that needs to be compacted, .gz files that need to be kept and .gz file older than 20 days that needs to be deleted.

The FTP should be managed like this way:

backup files coming every 7 days.
Only new backup files being compacted 
files .gz newer than 20 days keeps untouched
files .gz older than 20 days being deleted

By deleting file older than 20 days, allows to me at least 3 backup files on the FTP server. This is more than necessary for my needs.
Another point is that this FTP server receives files from other servers as well. Then it is necessary to verify which file I need to handle exactly"

First, I coming to the forum asking for help. I was trying to accomplish the same task but I was using a different approach and an inadequate one.
 I was using "for" and I was trying to get the variable generated from:

 files=($(find . -type f -name 't*' -mtime +"$days"))

if [ $? = "0"]

As explained by someone on the forum:

"The $?  will change after every command, so within the loop you can't depend on it. On top, the second if [[ $? ... ]] 's result is unpredictable at all. To do several tests on the result of a single command, assign its $?  to a variable and test against this."

 This is true and I got stuck trying to solve it.

Then, someone else proposed to create a temporary with the age of 20 days and use it as comparison. It works very well. Maybe I will never get to that by myself.

It was very interesting Challenge!!!

#!/bin/bash

# Create a temp reference file:

touch -d -20days "/tmp/20dayref.$$"


cd /srv/ftp

find . -type f  -name 't*' -print | while read file

//backup file starts with 't'

do

    if [[ ("$file" -nt "/tmp/20dayref.$$") && ( "$file" =~ \.txt$) ]]

//I am using .txt as example. It must reflect your backup extension.

    then

 #file is younger --append to archive


    echo "File": $file " is newer  than 20 days"
    echo "Compacting...."
    NOW=$(date +"%m-%d-%Y")
    FILE="test-Backup.$NOW.tar.gz.$$"
    tar -cz -f "$FILE" "$file"
    echo "Deleting ...": $file
    rm $file


elif [[ "$file" -ot "/tmp/20dayref.$$" ]]

then


 #file is old delete it

    echo "File": $file "is older than 20 days"
    echo $file
    echo "Deleted  permanently...."
    rm $file

else

echo "Job successfully completed!!!!"

    fi

done

Wednesday, May 6, 2015

Really getting stated with Python


Well, looks like my decision in starting again AND with Python was the right one. I am loving it.
As my first post with 'hands on' will be a very simple code taken from an excellent material I found on the Internet: "Hacking Secret Ciphers with Python with"
 Despite the pretentious title, the material if extremely newbie and very well written. I am expecting to learn a lot about coding and security.
 After explain many concepts about Python, the author presents a very simple code:

#Getting starting with Hacking ciphers
message = 'This message intend to be inverted'
inverted = ''
i = len(message) -1
while i>=0:
    inverted = inverted + message[i]
    i = i -1
   print(inverted)

As the book talks about cryptography and Cipher, this little program aims to perform a very simple way to add a very little security layer at the information. We are just inverting letters inside the message. For sure this is not considered to be a form of security. But, the idea here is start handling code in order to understand its utility in getting security information through the network.

Python 3.4.3 (v3.4.3:9b73f1c3e601, Feb 24 2015, 22:43:06) [MSC v.1600 32 bit (Intel)] on win32
Type "copyright", "credits" or "license()" for more information.
>>> ================================ RESTART ================================
>>> 
detrevni eb ot dnetni egassem sihT
>>> 

I'll try to explain this simple code. Actually to me even this code is not that simple. In short, what it does is at first the variable named message receive the value 'This message intend to be inverted'.
Every time you create a variable, you are actually reserving a memory space and putting there a value. In this case, the value is a "String". In Python, string can be written inside simple quote or double quote.
 If I put something like print(message) I'll retrieve the value in the memory and print will show the phrase.
 Moving down to the code, we have another variable named inverted. This variable has no value. We have just allocated a space in the memory and let it empty.The idea is use this empty slot in conjunction with the variable message in order for invert the phrase.
 Moving down, we can see a new variable name "i". The i's value will be a Python's function named len(). This function has the ability to return an integer representing how many characters there are in the string.
 To prove it, we can change our code:

#Getting starting with Hacking ciphers
message = 'This message intend to be inverted'
inverted = ' '
i = len(message) -1
print(i)
while i>=0:
    inverted = inverted + message[i]
    i = i -1
print(inverted)

We just inserted a print(i) after i = len(message) -1

The output can be seen bellow:

Python 3.4.3 (v3.4.3:9b73f1c3e601, Feb 24 2015, 22:43:06) [MSC v.1600 32 bit (Intel)] on win32
Type "copyright", "credits" or "license()" for more information.
>>> ================================ RESTART ================================
>>> 
33
detrevni eb ot dnetni egassem sihT
>>> 
First, it shows how many characters has the string. Then, it shows the string inverted.

We can do one more thing:

#Getting starting with Hacking ciphers
message = 'This message intend to be inverted'
inverted = ' '
i = len(message) -1
print(i)
while i>=0:
    inverted = inverted + message[i]
    i = i -1
    print(message)
print(inverted)

>>> ================================ RESTART ================================
>>> 
33
This message intend to be inverted
detrevni eb ot dnetni egassem sihT
>>> 
I just add a print after  i = i -1 and we can see  the code inserting the phrase in the memory as much times as the amount of character in the string.

We can also discriminate which character is in a specific position:

#Getting starting with Hacking ciphers
message = 'This message intend to be inverted'
inverted = ' '
i = len(message) -1
print(i)
print(message[11])
while i>=0:
    inverted = inverted + message[i]
    i = i -1
print(inverted)


>>> ================================ RESTART ================================
>>> 
33
e
detrevni eb ot dnetni egassem sihT
>>> 

We are showing how many characters there are in the whole string and which character is in the position 11 of the memory. In this case the character "e".


The last one is far more interesting:

#Getting starting with Hacking ciphers
message = 'This message intend to be inverted'
inverted = ''
i = len(message) -1
print(i)
print(message[11])
while i>=0:
    inverted = inverted + message[i]
    print(i, message[i], inverted)
    i = i -1
print(inverted)

This produce the following output:

Python 3.4.3 (v3.4.3:9b73f1c3e601, Feb 24 2015, 22:43:06) [MSC v.1600 32 bit (Intel)] on win32
Type "copyright", "credits" or "license()" for more information.
>>> ================================ RESTART ================================
>>> 
33
e
33 d d
32 e de
31 t det
30 r detr
29 e detre
28 v detrev
27 n detrevn
26 i detrevni
25   detrevni 
24 e detrevni e
23 b detrevni eb
22   detrevni eb 
21 o detrevni eb o
20 t detrevni eb ot
19   detrevni eb ot 
18 d detrevni eb ot d
17 n detrevni eb ot dn
16 e detrevni eb ot dne
15 t detrevni eb ot dnet
14 n detrevni eb ot dnetn
13 i detrevni eb ot dnetni
12   detrevni eb ot dnetni 
11 e detrevni eb ot dnetni e
10 g detrevni eb ot dnetni eg
9 a detrevni eb ot dnetni ega
8 s detrevni eb ot dnetni egas
7 s detrevni eb ot dnetni egass
6 e detrevni eb ot dnetni egasse
5 m detrevni eb ot dnetni egassem
4   detrevni eb ot dnetni egassem 
3 s detrevni eb ot dnetni egassem s
2 i detrevni eb ot dnetni egassem si
1 h detrevni eb ot dnetni egassem sih
0 T detrevni eb ot dnetni egassem sihT
detrevni eb ot dnetni egassem sihT
>>> 

It prints the total number of character, the eleven character and each memory position with its respective value.

And this is it. This simple code is able to read the string, count how many characters it has, decrease it one by one and put each value in the memory and show it inverted.
 According to "while", "i" must be greater than or equal to zero. This is the trigger to the code stop the process and show the message.
 The result is quite simplistic but the idea is great. In a so simple code we can see lots of concepts surrounding this amazing programming language.


Monday, May 4, 2015

Getting started with Coding

This is not the first time I decide to start with Coding. Since the university where I was presented to Java, I have made some approaches with Shell and C. I have gave up from both.
 The fact is, for some reason I don't know, I have some difficult to dedicate all my attention in learning coding. I feel like when I was in the middle school learning math. I was not that bad, actually I was good,but, I have had to spend a lot of energy to stay focus. If I was able to stay focus since the beginning of a new subject in math, I was able to compete with those who had much more talent than me. Different from any other subject  with a few amount of time and energy I was able to go for it and have a nice score.
 I feel the same when it comes to coding. I had not a good experience with Java in the university and I hated to have Java in a Computer administration course.
 The reason why I decided to try again is because there is always a voice inside me saying to learn it. Actually, I can do my job very well without knowing any programming language, I did it so far, but, I realize that to go farther and really make the difference, I need to know at least one scripting programming language.
 With that in mind, I decide to try again and this time I choose Python. Python looks a lovely Programming language. It can be defined as a scripting language and looks far more easier than Java or C. I know that if a programmer read this post he would say something like "you need to learn the logic", programming language is just a tool to use the logic. Ok, I agree, but, I don't see any problem in get more comfortable with one tool than other. As I see so far, Python looks really great.
 I am really excited about it. I feel like I finally found something to start. As long as I can keep focus, I believe I can learn it and have success using it during my jobs. I have seen Python inside boxes I have access to. Cisco boxes are full of Python scripts. I know I can not change it but I can understande it and maybe getting more comfortable and easy my pain in some situation.
 I've read about nice things related with Data centers automation and it is all about scripting. Water it down can  be the next step I need to become more and more successful in my profession. That's I am always looking for.

Sunday, April 26, 2015

Blog Title change.

Well, this my self study blog. I dont need actually justify any change. I feel free to add/delete and change anything at any time I want. I think routingtelecom is too big. And it cames from a time when I was intending to start a company as Asterisk consultant. Then Telecom has something professional. As this idea pass away and it turned into a self study blog only, I think RoutiOS may be better. I love route as it is the truly and real process that allows any kkind of communication. And iOS is the most common and used term in this days. Cisco and Apple the sexiest world companies uses those three letters to designate the operating systems.
 This is smaller and even more representativa but at the end is just a title. What I realy want is share more and more interesting stuff on it.
 Thats the reason, thats my goal.

Saturday, April 25, 2015

QUIC Protocol - The protocol Quick

 The Internet traffic has grown  tremendously in last years. The demand for faster Internet keeps growing and surprisingly we are working with protocols developed 40 years ago. Even http version largely used today (http 1.1) was developed around 90's.
 It is not difficult to realize that we need to build faster protocols. Protocols able to handle the today's Internet.
 TCP has made remarkable work until now and will do for many years ahead but TCP  was developed in a totaly different scenario.
 Companies has made huge effort trying to make things better. To delivery  much better experience for users. And in this scenario, Google came with a brend new protocol called QUIC (Quick UDP Internet Connection).
 Before deep dive in QUIC, it is important  discus about another protocol also developed by Google, this one called SPDY. As mentioned before, http 1.1 is no longer indicated for today's Internet. It was developed in a time where web pages were static, load from one only source and one domain. Today´s web page are load from about 80 differents sources and about 30 domain. The web page is a big mosaic and each piece coming from one point of the world. Sure enough, to handle all of it is necessary a very smart and high performance protocol.
 In this scenario Google has developed SPDY. The main goal of SPDY and QUIC is reduce Latency. It is all about latency. SPDY is a application protocol that works compressing,multiplexing and prioritizing data.
 According to Google's SPDY definition, "SPDY is a multiplexed stream protocol currently implemented over TCP. Among other things, it can reduce latency by sending all requests as soon as possible (not waiting for previous GETs to complete)"
 But, there's a problem here. As mentioned SPDY run over TCP and TCP has some characteristic that is not in accordance with the goal of SPDY low latency.
  TCP has a known behavior called Head-of-Line Blocking. Since TCP only provides only a single serialized stream interface, if one packet is lost it will interfere in the entire SPDY communication. SPDY multiplex many stream over TCP connection but Head-of-Line Blocking cancels it.
 A good example of this scenario can be seeing bellow:

 If the red packet is lost, all other flows must wait.
To overcome this and others issues, QUIC comes to the scene. With QUIC, the above scenario has changed completely:


  From now one, the improvement allowed by SPDY shows up. If the red packet is lost, the whole flow does not suffer anymore.
QUIC run over UDP for good reason. UDP does not perform three way hand shake as TCP. Its nature makes it fast. As QUIC aims to zero RTT it is impossible to run over TCP.

 The following figure shows that concept:


 With QUIC, Google aims the following goals. Those goals were taken from "QUIC: Design Document and Specification Rationale".

1-Widespread deployability in today’s Internet.
This is not easy to achieve. As we may know, Google can't perform any change in the Internet structure. SPDY and QUIC must be transparent on the Internet. Otherwise it will be blocked along the firewalls and router out there.
 Perform change in TCP/UDP/IP headers only can be made by regulatory entities and it takes lots of years. Furthermore, the adoption of this changes can take even more time. Those protocol lives inside all kernel around the world and it is really complicate to get all those kernel upgraded.

2. Reduced head-of-line blocking due to packet loss
As we saw above, this is possible with QUIC.

3. Low latency (minimal round-trip costs, both during setup/resumption, and in
response to packet loss)
This is the main objective of the protocol

4. Improved support for mobile, in terms of latency and efficiency

5. Congestion avoidance support comparable to, and friendly to, TCP

6. Privacy assurances comparable to TLS

7. Reliable and safe resource requirements scaling

8. Reduced bandwidth consumption and increased channel status responsiveness

9. Reduced packet-count

10. Support reliable transport for multiplexed streams

11. Efficient demux-mux properties for proxies

12. Reuse, or evolve, existing protocols at any point where it is plausible to do so,
without sacrificing our stated goals

By achieving those goals, Google will have built a much more fast Internet. I doubt anyone has courage to say Google will fail  in building  such huge accomplishment. Considering the past and present of this remarkable company, we must wait nothing but the whole Internet structure transformed forever. As network engineer, we need to understand those protocols and any other to come to stay ahead of our time. Google has already proved its capacity in transform the way we live.

This is a "Quick" overview about this very interesting protocol. I'd like to go deeper and maybe perform some practical demonstration. But we can continue in another article.

What do you think about it ? Will Google really going to change the whole Internet by developing protocols like QUIC and SPDY ?
Is it possible a future where we will have Google Apps, Google operational System, Google Internet protocol and Google world wide network ?
It is really scary , isn't it ?