VPC stand for Virtual Private Cloud and it is a Data Center you can create on the Cloud using Amazon AWS.
There are some required steps you should know in order for to have a up and running environment on the Cloud and that´s our goal here.
First of all you need to have, of course, a valid user on the Amazon console which you can access here. If you don´t have an account yet, I strongly encourage you to create. Of course, considering you have interest in AWS, as I am.
Another very important thing to learn when it comes to AWS is what you can do without paying anything. In the past, I have created an account and start digging through Amazon services without orientation and at the and of my free period, I received a fee. It was not a absurd, but I did not intend to pay anything, I was just trying it. At that time, I talked to an Amazon representative and I did pay anything by the way. Therefore, I recommend you to pay attention on this because it might change sometime and you may end up with a Bill in your hand and have to pay it.
The nice thing about AWS is that you can actually use it without paying during your free eligible period, or at least, paying only a few dollars.
Considering you have successfully logged in the Amazon Console, if this is your first time, you are going to see this:

Ow yeah!! Each icon is an Amazon service and yes, Amazon has been one the most innovative company.
I felt in love for this company about 3 years ago when I was called for an interview. I didn´t know the company too much and I got really surprised. Sadly, I didn´t make it on the interview, but I did learn a lot about Cloud since then.
Back to our objective here, once you get on this amazing portal, you need to scroll down and find, under Networking, the VPC icon. By clicking on it, you will be presented to the VPC dashboard with a lot of information. To be more effective here, I will focus on the things we are going to use only.
You have a "Start VPC Wizard" which I never used, and I recommend you to do the same. The idea here is learn in detail and Wizards tends to let things easier.
Under the "Start VPC Wizard" you have some web links and the first of then is "VPCs". You may have a number 1 on it, this indicate you already have one VPC created. In my case, I have zero because I deleted my default VPC and I have the felling I need to call Amazon if I want it back. As I don´t, I will not call.
By click in "VPCs" whether you have 1 or 0, you can create a brand new VPC from scratch and that´s the idea here.By the waay, you can create up to 5 VPC per Region.
When you click in "Create a VPC, you´ll receive a window where you can give your VPC a name and a CIDR block. If you dont know what CIDR block is I recommend you to read some paper about it. It is very important and don´t make any sense to know something about VPC if you don´t know it.
In short, CIDR is the IP addressing your are going to use inside your VPC.

I´ll call it MyVPC and I´ll allocate the 10.0.0.0/16 CIDR according to the RFC 1918. You can´t use larger mask here then that and I don´t recommend you use a smaller one.
In tenancy, let it as Default, the other option will cost you a lot of money.
If the brand new VPC doesn´t appear right after you have created, don´t worry. Refresh the page and wait a few seconds.
As soon as it has been created, it will appear as available.
A few important information about VPC is Subnets, Route Tables, Network ACLs, Security Group and Internet Gateway.
Some of this will be automatic created for you like Routing Tables, Security Groups and Network ACLs but we are going to created our own version of each of this.
The first thing I believe make more sense to create and, as you can see, the system does not create a default for you, is Subnets.
Subnets is what gives VPC a reason and it is where we a going to put our hosts. To create one or many, go to the Subnets left side menu and click in "Create Subnet".

Name tag is a name you can give.This can be anything. I like the example I saw on the Internet where the name contain the CIDR block to this subnet, the availability Zone and an indication of what this Subnet is about. In my case, I dicided to use 10.0.1.0/24 as Public. Which means, the servers I will put on this subnet will have access from the Internet.
You may be asking: But this kind of IP address is not routable on the Internet and you are right about that. We´ll see how to solve it. By now, lets determine this Subnet as our Public subnet or DMZ.
The process may be finished here, depending on what you want to do. In my case, I´ll create another Subnet and I´ll call it Private. I want to create an environment where some servers will be reached from the Internet and others will not.
So, to create the Private network, repeat the process we just made. Take care to use a different Subnet block. In my case, I´ll use 10.0.2.0/24.

We can see that, I used another IP address block, Called it Private and put it in another Availability Zone. Which is a very good idea. This gives my environment, redundancy.
An importan concept about AWS is each Availability Zone means one Subnet, you can´t have more then one subnet per AZ.
As I mentioned before, one of my Subnet will be Public. To do so, I need to change on configuration parameter.

Go to Subnet Actions and in "Modify auto-assign IP setting" just click in "Enable auto-assign public IP4 address".
By doing so, when you designate a host to this Subnet, it will be given to this host an valid public IP address and it will be accessible from anywhere.
Well, so far we have a VPC created, our VPC has two subnet one we called Private and another one we called Public. Our public subnet has a feature that allows it to get public IP address. Our environment is almost done!
Another very important concept in Networking is Routes. Routes allows our hosts to send packets back and forth depending on the origin or destination.
As you can see, when we created our VPC, a default route have been created automatically. Let´s take a look on it:
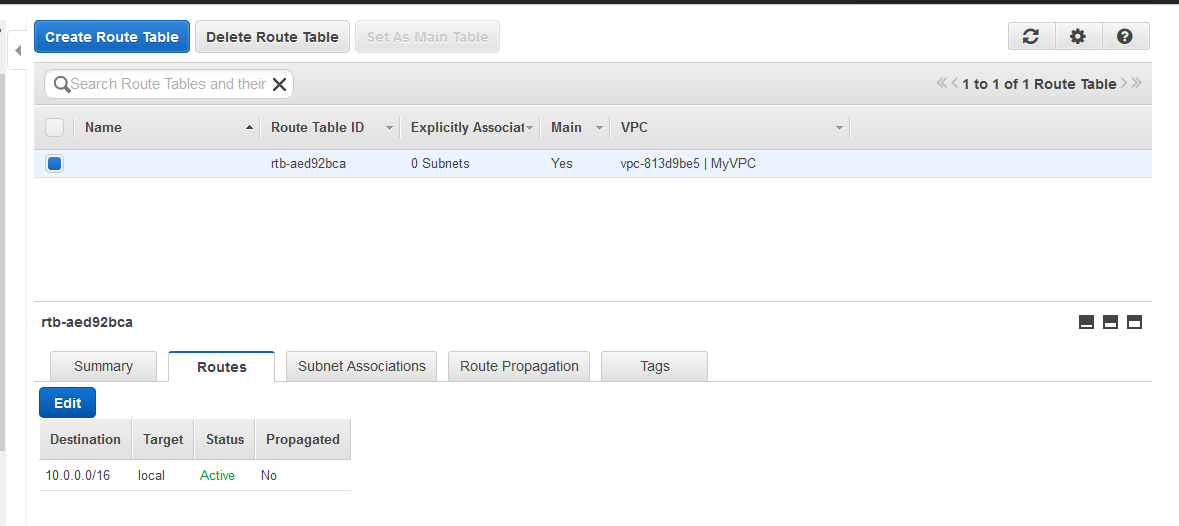
As we can see from the image above, our route table has only one route. This make sense, after all we have only the Network 10.0.0.0/16 on the environment. This means that our hosts will be able to reply IP packets to this network and that´s it. If a packet comes from a different network, the hosts will discard them. After all, they don't know where to send it.
To solve this problem first of all we are going to create a Gateway. Gateway is an entity that allows hosts communicate between networks. When a hosts need to send a packet to another host and this hosts belong to another network, this packet needs to be delivered using a Gateway.
To create a Gateway on this environment, just follow the image bellow:

Bu hitting "Create Internet Gateway" you can give your Gateway a name and then hit Yes, Create.

Therefore, when the Internet Gateway is created, it was Detached from your VPC. You need to Attach it by clicking "Attach to VPC".

If you have more then one VPC, make sure to select the correct one. If you are good to go, hit Yes, Attach.

This is the final result and now we have a Internet Gateway to serve your VPC.
But we still need routes. That´s the next task. Let´s create a brand new Routing Table:

Give it a name and associate it to your VPC. You now have two Routing table. The default one and the one you just created.
Let´s edit the one we created.

Before editing, we can see that we only have the default route to our 10.0.0.0/16 Network. What we are going to do here is to create a new route. To do that, we need to hit the "Edit" button and "Add another route".

By hitting "Add another route", a new line appear. As we are going to create a route to the whole Internet, we need to use the 0.0.0.0/0 notation. This means Everything. By clicking on the next box, the Internet Gateway we have created appear as option. Make sure you are using the right one, in case you have more then one.

This will be what your routing table will look like. Now you have two routes. One the the local Subnet and one to the whole Internet.
Well, we need to make it better. Our Routing table, in terms of internal network, is summarized in 10.0.0.0/16. Therefore, we have two Subnets behind it. The routing table needs to know which one to send.
We can do this in the "Subnet Associations" and then "Edit" button:
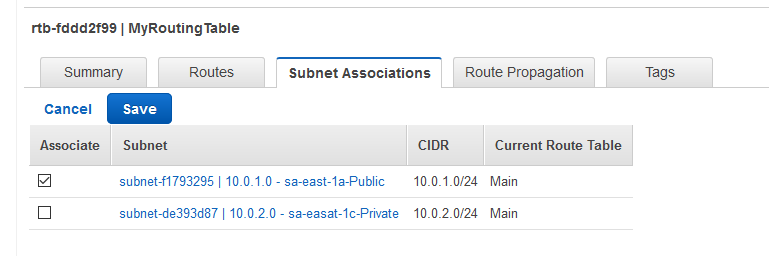
By hitting "Save", our routing table will be able to decide to which Subnet it must reply.
We need one last step in order for to have our environment ready. We need to create a Security Group.

Again, we are going to ignore the default configuration AWS have made, and we are going to create a new Security Group.
Security Group is somehow a Firewall that protects our environment. It is important to say that Security Group only permit packets, you can´t deny anything explicitly. Actually, an implict Deny will exist at the end like a Firewall does. If you need to play with permit and deny interchangeable, ACL is the right thing for you.
This first Security Group will be protecting our DMZ or Public network. We will be allowing only SSH,ping and HTTP connexions to our DMZ server. Anything else will be blocked:

One very import thing here is the "Source" box. As you may not know the source, it is advisable to allow the whole Internet again: 0.0.0.0/0. If somehow you know the source, we can specify the origin. This will turn your environment much more security but be aware that this may create some trouble if you have differents source and eventually you forgot something.

You don't need to worry about the Outbound Rules. Everything will be allowed in Outbound by default.
Our VPC is ready to receive hosts and to do that we are going to go to EC2.
On EC2, if this is the first time you are here, you will see that "Running Instance" will be zero.
What we are going to do now is create two new EC2 instances. One of them will be our public server and the other one our private.
Take care by selecting your server. Depends on the kind of EC2 you select you´ll be charged. It is a good idea delete your EC2 after your Lab finished.
This said, hit "Launch Instance". I´m not teaching how to create an EC2 instance step-by-step here as this Post is too long already. But you can find this information easily on the Internet. If you find some difficulty, please let me know and I´ll help you.

My first Instance is up and running. Some important information is highlighted in yellow. We can see that the AZ (Availability Zone) is sa-east-1a, which I choose as DMZ and it has been given to our server a Public IP address of 56.67.206.38.
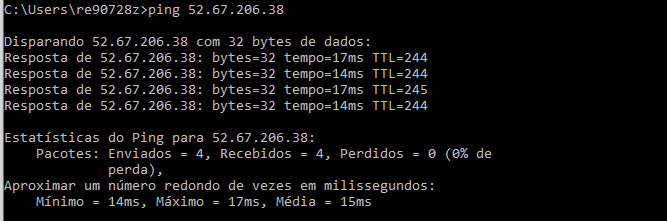
I am able to ping it, as I have allowed ICMP on my Security Group.

And we are able to access the server using SSH as well.
Until this point, our DMZ is ready. We have a Server on it and this server is reachable from the Internet.
Now, as our final step, we are going to create a EC2 on our Private network and see which is the difference:
As we said before, we can have as many Security Group as we need. Then, for our private server we are going to create a new Security Group. We are going to call it DB-SEC and we´ll allow ICMP and SSH.

Notice that now I have changed our Source. As this server is going to be installed in the Private network, it will be only accessible through our public network. As I know the origin, I can allow only this network.

As we can see from the image above, this second server doesn´t have an public IP address. This happen because we have put it on the Private network sa-east-1c. But we can see that it has a Private IP address 10.0.2.88.
Of course this IP will not ne accessible from the Internet, but we do can access it from our Public Server:

That´s it guys. If you, like me, are preparing for the AWS Architect Associate exam, let me know. We can exchange experience and help each other to clear the exam.
Cheers!!!
Nice article I was impressed by seeing this blog, it was very interesting and it is s for sharing all the information with us all.very useful for me. Thank you for sharing any good knowledge and thanks for fantastic efforts.
ReplyDeleteoracle training in chennai
oracle training institute in chennai
oracle training in bangalore
oracle training in hyderabad
oracle training
oracle online training
hadoop training in chennai
hadoop training in bangalore